June Plan With Me Supplies
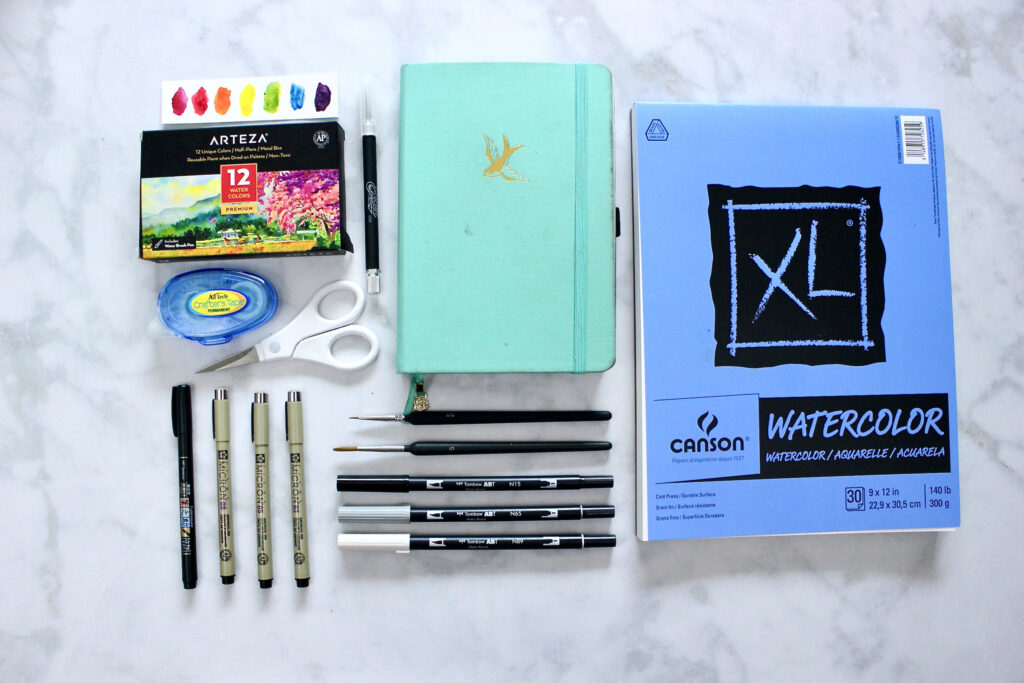
- Archer & Olive A5 Bullet Journal
- Use code CREATEWITHCAIT10 for 10% off
- Arteza Watercolours
- Round Brushes, 00, 5
- XL Canson Watercolour Cold Press
- Micron Pens, 03, 05, 08
- Tombow Fudenosuke Brush Pen, 2-Pack
- Tombow Brush Pens, N15, N89, N65 (All from grey scale pack)
- X-Acto knife
- Archer & Olive Acrylograph White Pen
- Use code CREATEWITHCAIT10 for 10% off
- Crafter’s Tape
- Paper Cutter
- Washi Tape
June Plan With Me Breakdown
Quote Page
Supplies
- Arteza Watercolours
- Cadmium Light Yellow A101
- Cadmium Light Red A200
- Amaranth A401
- Prussian Blue A504
- Deep Ocean Blue A501
- Round Brushes, 00, 5
- XL Canson Watercolour Cold Press x2 sheets
- Tombow Brush Pens, N15
- Archer & Olive Acrylograph White Pen
- Use code CREATEWITHCAIT10 for 10% off
- Crafter’s Tape (or glue stick)
- Paper cutter
- Washi Tape
How To Create
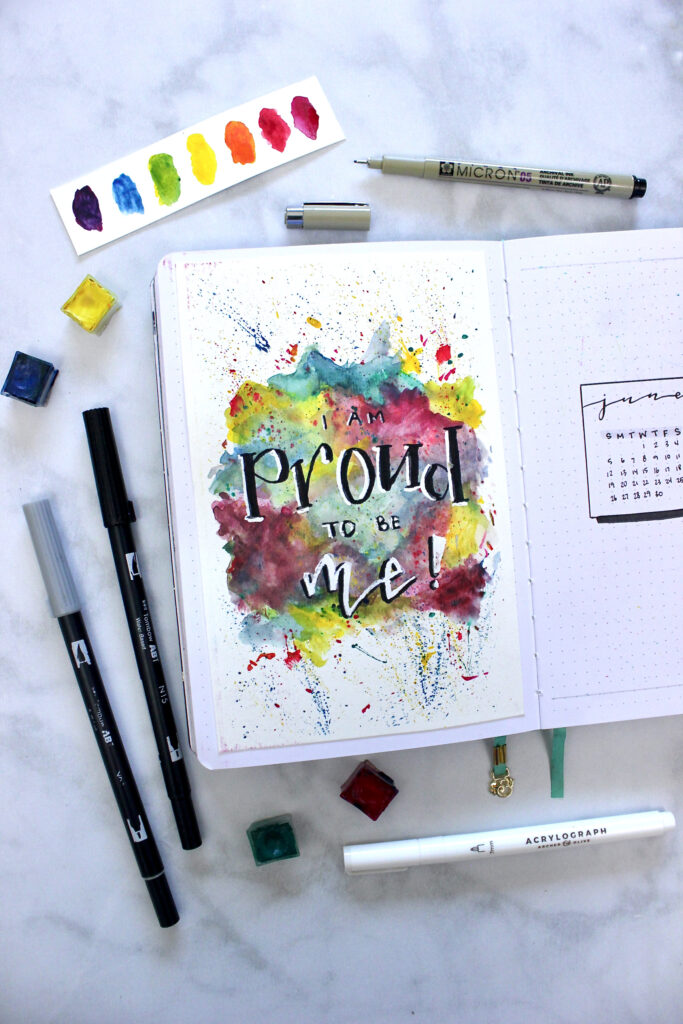
Cut out a 12 cm x 19 cm watercolour cold press sheet. Use the washi tape to create a thin border around the page, half sticking to the sheet while the other sticking to the table. This will help make sure that your page does not move when painting overtop and create a clean border around your finished product.
the primary colours (Cadmium Light Yellow, Cadmium Light Red, Deep Ocean Blue A501) in different sections on the page. If you are wanting a more transparent colour background, add more water to your pigment. The opposite applies for if you want brighter, bold and pigmented colours… just add less water!
Using a wet on dry technique (really wet brush and no water on the paper), start by placing the primary colours (Cadmium Light Yellow, Cadmium Light Red, Deep Ocean Blue A501) in different sections on the page. If you are wanting a more transparent colour background, add more water to your pigment. The opposite applies for if you want brighter, bold and pigmented colours… just add less water!
Once you are happy with the placement of the primary colours now comes time to MIX! With a clean brush (NO watercolour, just water!), come in a start mixing the colours together. When going between different colours make sure to clean off that brush again otherwise the page will end up muddy looking and only one colour. For me personally I like starting with mixing the yellow and reds, yellow and blues, and finally the red and blues. If you are finding that you are losing a distinct colour, go back and add it in! This happened in my painting specifically with the yellow patches.
After the centre part of the painting is completed come in with your finger to flick the bristles of the brush over the page. What you should end up getting are different splatters of varying sizes. For larger blogs add more liquid, and for those smaller splatters you don’t need as much water!
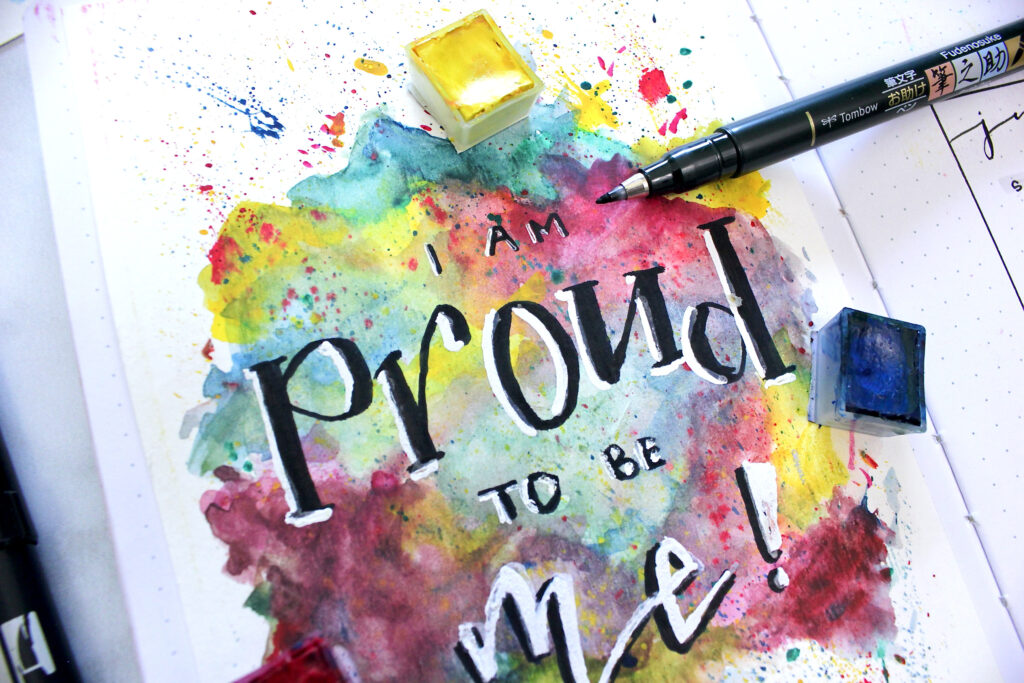

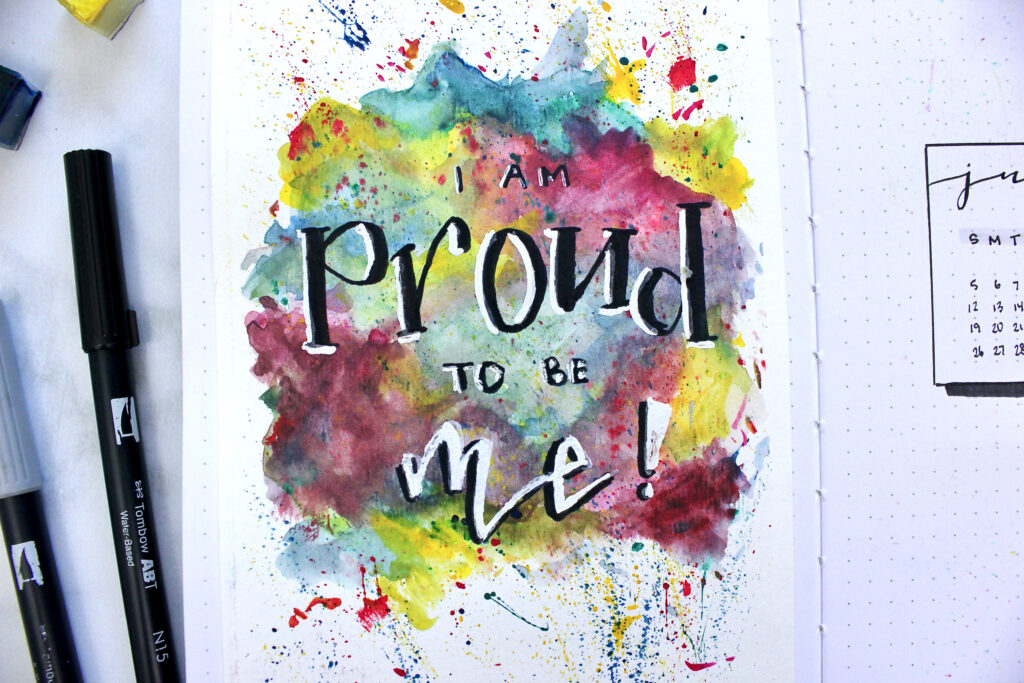
Here is where patience is KEY… and without it, will make the next step all the more difficult. Once the page has FULLY dried (this is the part that I suck at and tend to push the limits on) come over top with your lettering. The saying I chose this month is “ I am proud to be me!” and centred it in the page. To create the black lettering I used the Tombow dual brush pen, N15. While the white Acrylograph marker was used for the word “me” and as a drop shadow to make the letters stand out on the page more. When in doubt add a drop shadow!
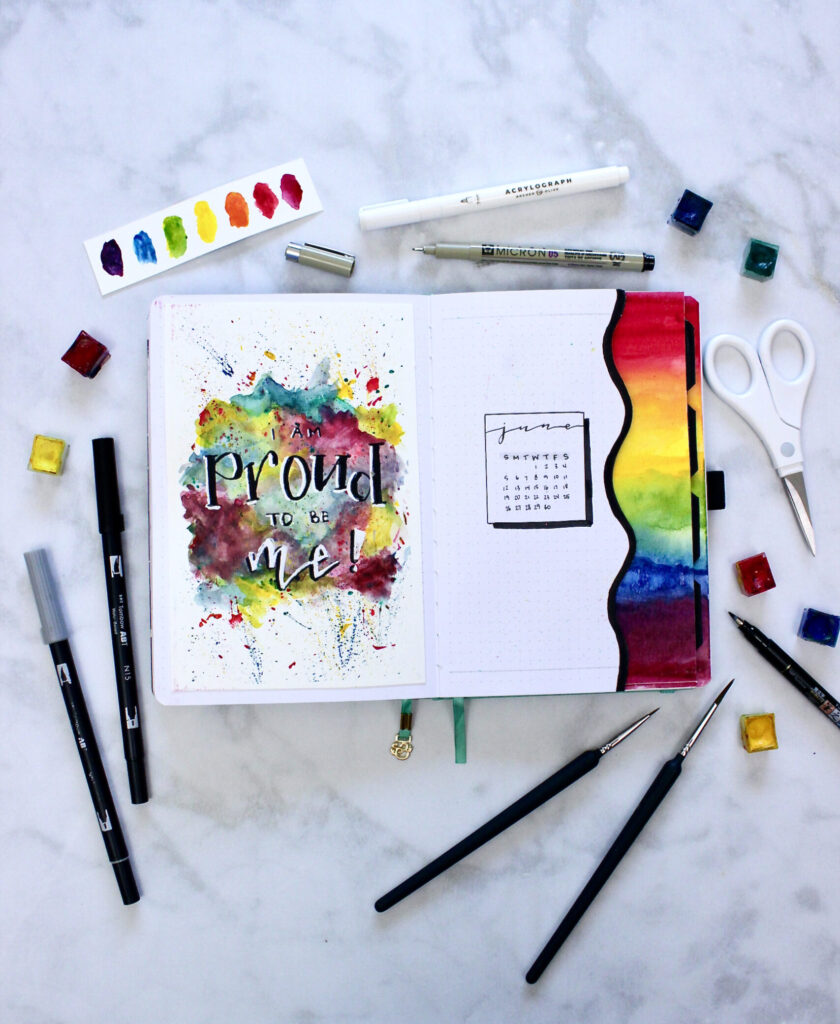
Now’s the time to add it into our journal. To do this I can’t help but recommend crafter’s tape, which is a double sided tape roller that eliminates the stickiness often found when using glue sticks. But whatever you have on hand will do the trick!
Cover Page
Supplies
How to Create

Because I am creating a Dutch door for my cover page (more on that later), I wanted to keep the rest of the cover page fairly simple. In the centre of my journal I drew a 5 cm X 5.5 cm box using the Micron 08 pen.
Connected to either end at the top quarter of the box was a cursive June title. If you are not confident in this style (which was me not so long ago) start out with a pencil sketch. When it’s time to use your pen, lift it off the page after each letter to allow you more control in following your guidelines. I still use both of these tips to this date! Centred inside the box right underneath our title is a mini calendar. This is used as a quick reference versus actually writing out what will happen in the month (we have another spread for that coming real soon!).
Dutch Door
Supplies
- Arteza Watercolours
- Amaranth A401
- Cadmium Light Red A200
- Cadmium Light Yellow A101
- Prussian Blue A504
- Deep Ocean Blue A501
- Round Brushes, 00, 5
- XL Canson Watercolour Cold Press
- Crafter’s Tape (or glue stick)
- Paper cutter/Scissors
- Tombow Brush Pens, N15
How to Create

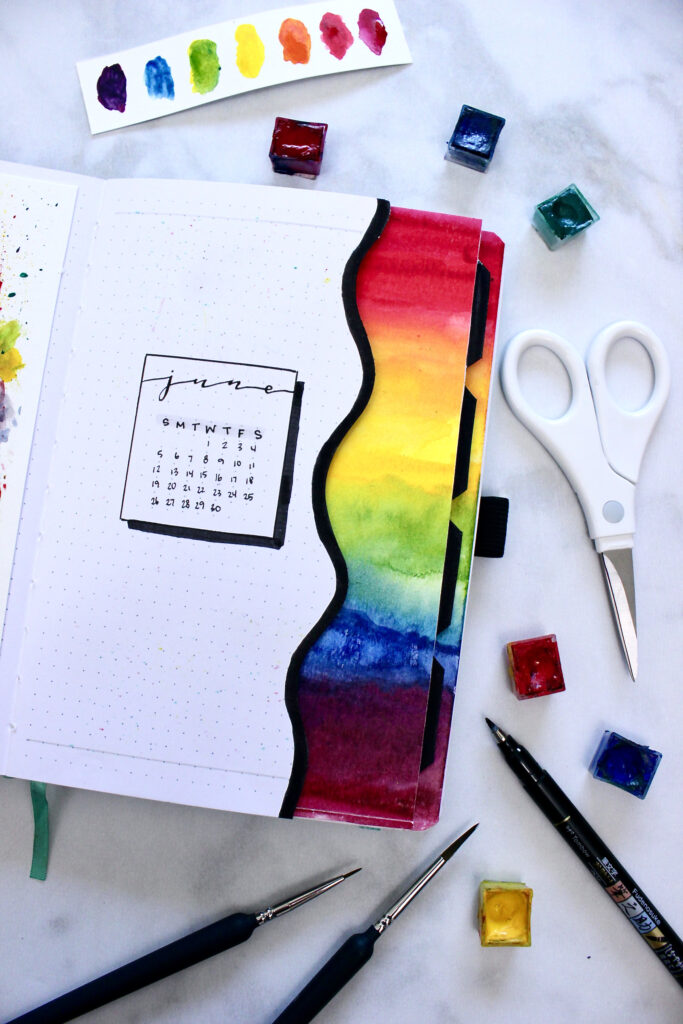
If you’ve never heard of a Dutch door before, the most simplest way to explain it is it’s when you use scissors to cut a piece of your journal out. Que the fear and screams and “oh my god what are you thinking!”. Yes I was one of those people too, but after trying it I am NEVER going back! If you want to know more about Dutch doors and how they work check out my blog post and YouTube video for more info!
Here I marked out 4.5 cm from the right side of my journal going in. From that mark I pencilled and cut out a curvy line using an X-Acto knife (scissors work just fine too but you may need to move your book around more to get this type of line). What happens is there’s now a section available from the page underneath that is seen and part that is kept hidden. What you do with the underneath part is your choice I ended up putting in a Ta-Dah list.
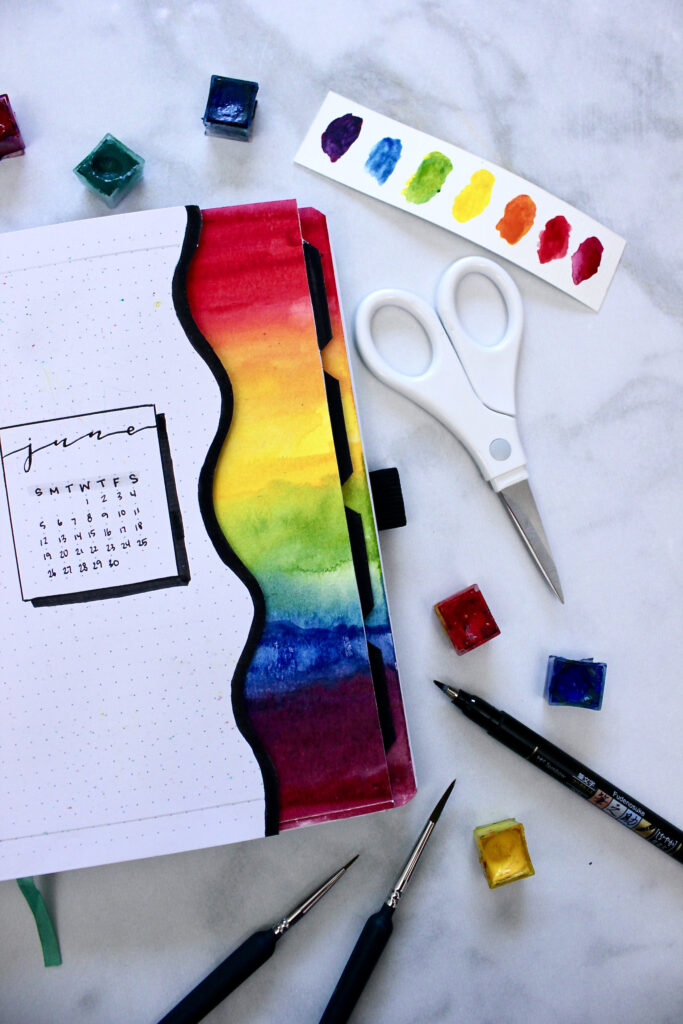
For the section that is showing, use the watercolour set to create a gradient effect from red to purple. The colour order I used is as follows:
- Amaranth A401
- Cadmium Light Red A200
- Cadmium Light Yellow A101
- Prussian Blue A504
- Deep Ocean Blue A501
- Amaranth A401
To measure the exact size of the watercolour paper, measure the distance of the curve furthest from that right side. For my journal the dimensions ended up being 5 cm X 21 cm. Make sure to use the same techniques suggested before when blending your colours to create the smoothest effect. If you have too much pigment it will make it harder to seamlessly blend the colours together.
Once completed glue the watercolour gradient to your journal.
Ta-Dah
Supplies
How To Create
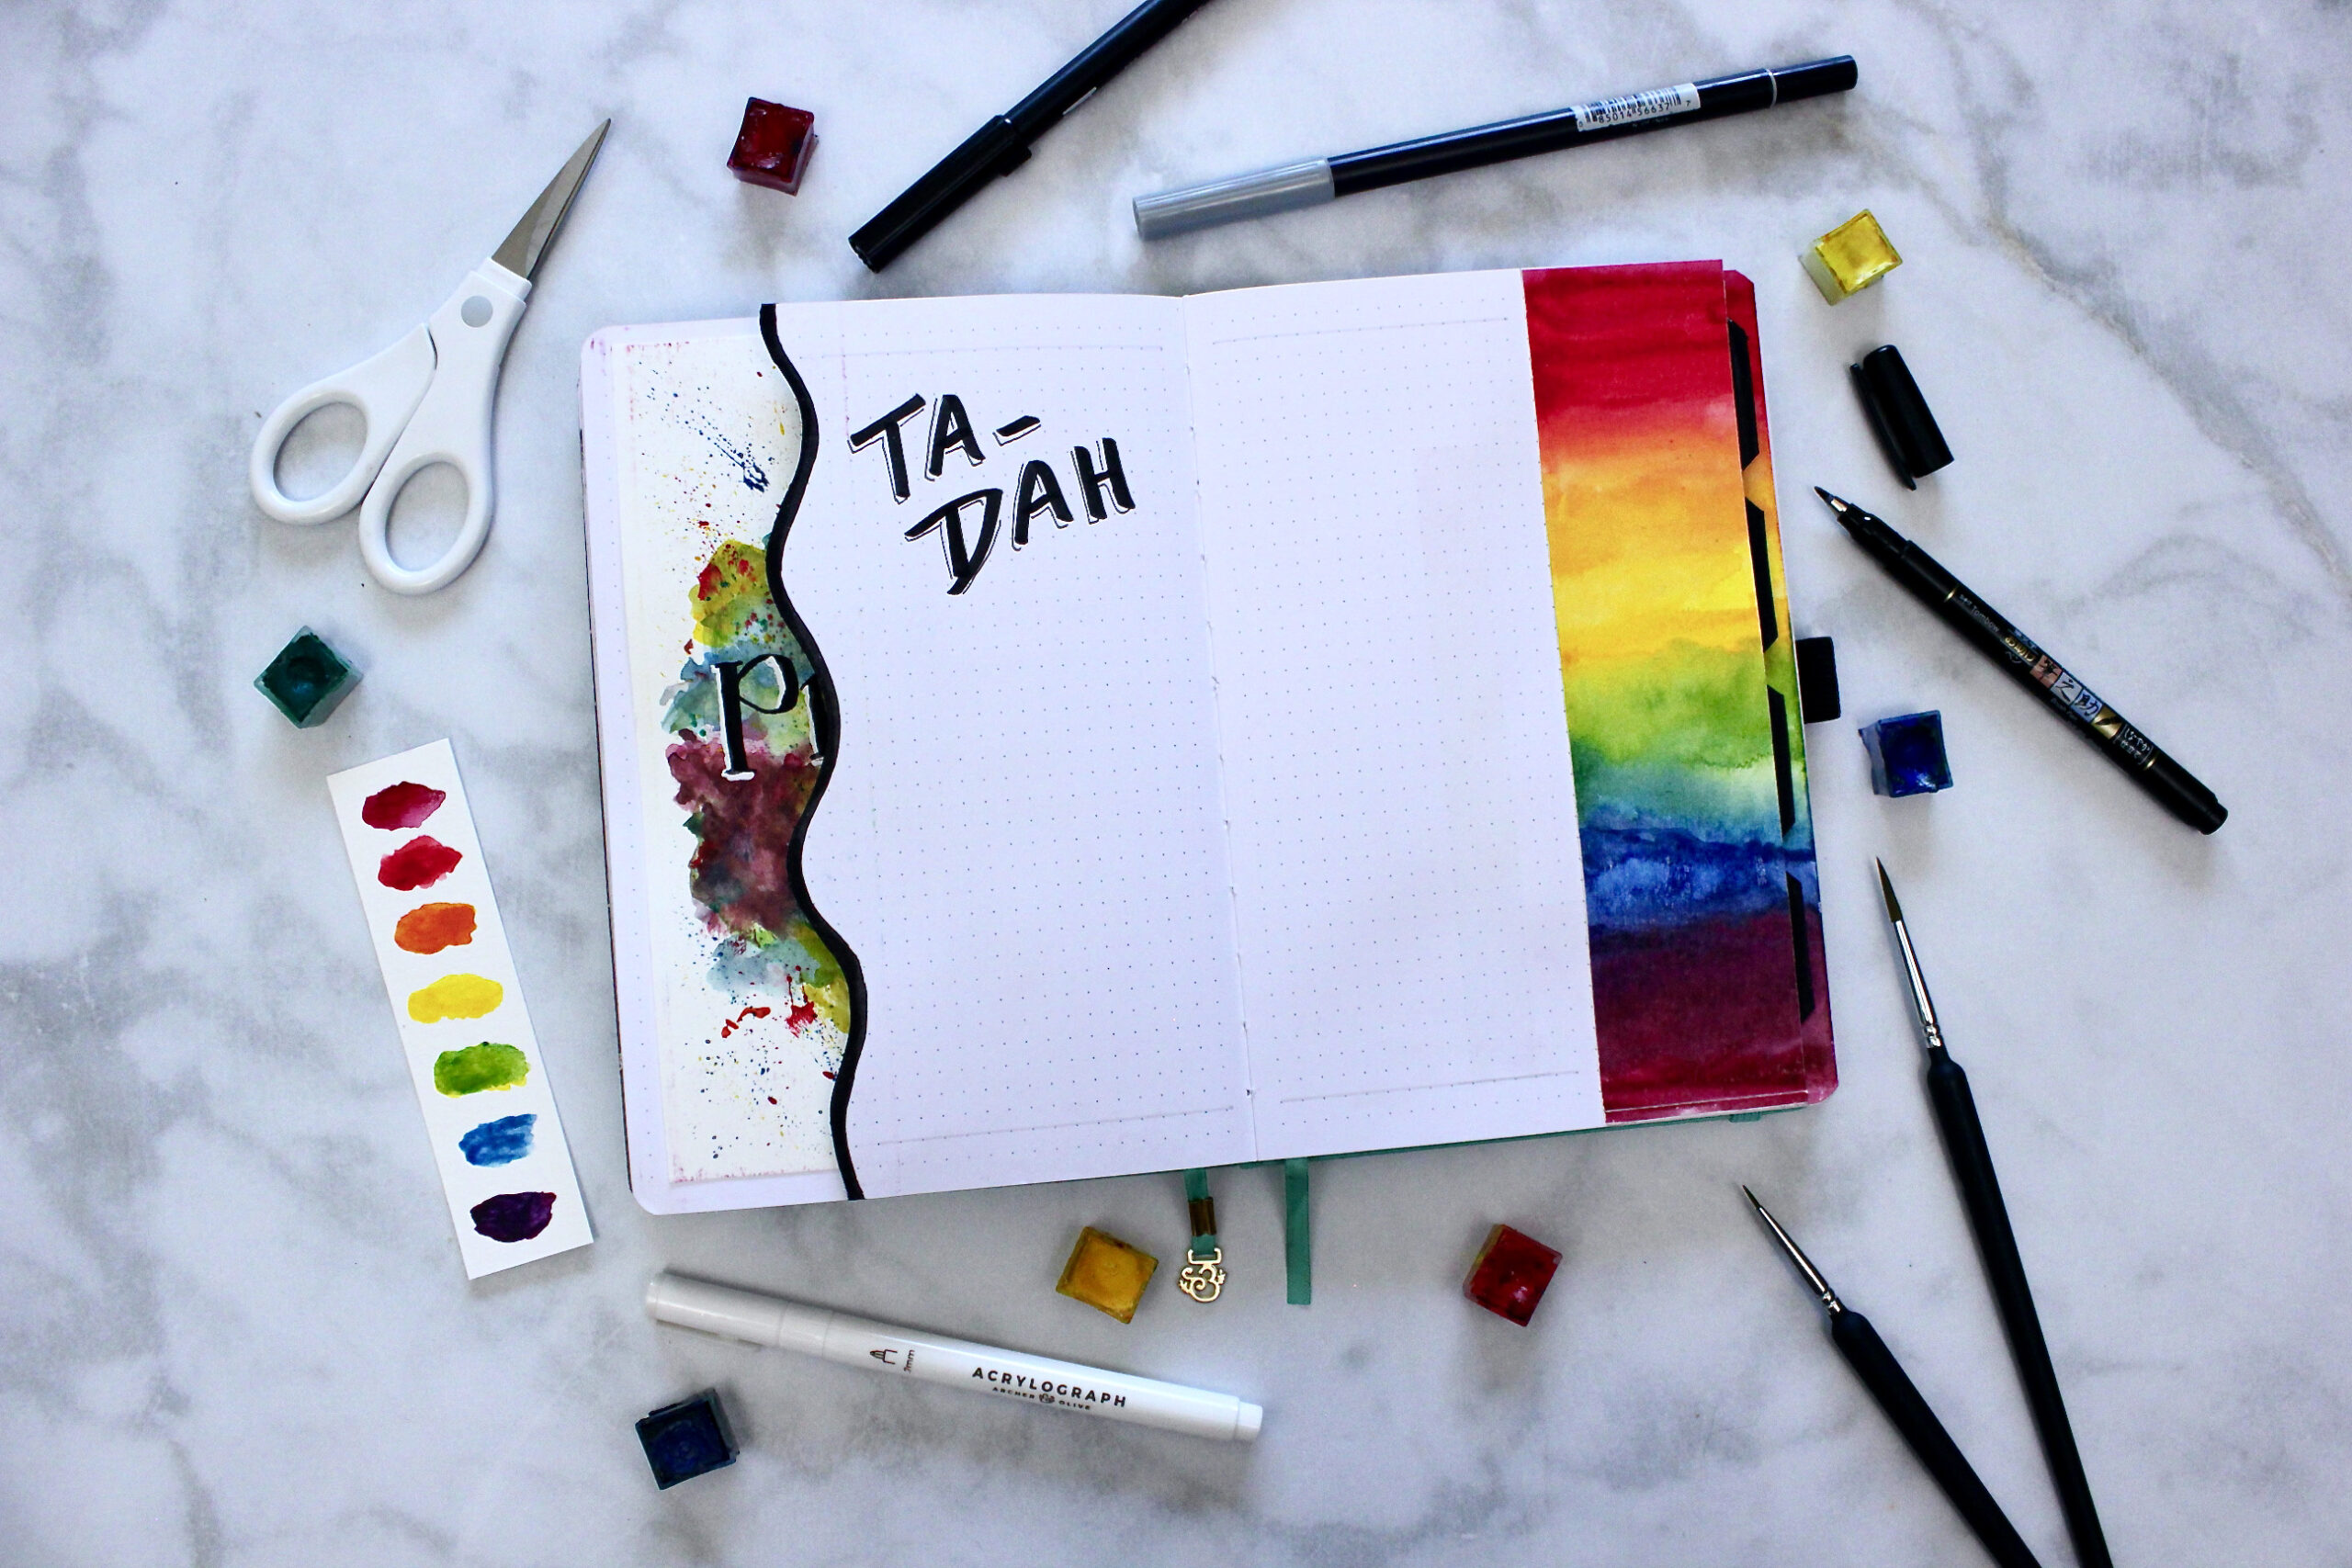

The lettering used to create this is a loose style block lettering. Now I don’t have the nicest of block lettering letters, so how I get around this is by adding a thinner line on either the left or right side of each letter. This time around (let’s be real, most times around) I end I putting the line on the left side of the letters. Think about it like this… if I were to add a drop shadow to the letter where would it be?
When I was first learning this I used two different colours to write out each letter. One colour would be my base (in our case the block lettering), while the other was the drop shadow (our thin line). When creating the drop shadow, I move my marker slightly to the left and down and wrote the letter out the same way, without lifting it from the page. This eliminated the guess work.
Monthly Calendar
Supplies
- Arteza Watercolours
- Cadmium Light Yellow A101
- Cadmium Light Red A200
- Amaranth A401
- Prussian Blue A504
- Deep Ocean Blue A501
- Round Brushes, 00, 5
- Micron Pens, 03, 05, 08
- Tombow Brush Pens, N15
- Washi Tape
How To Create
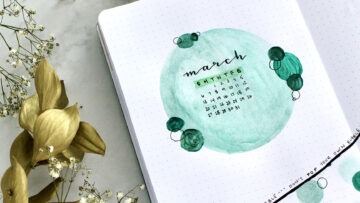
At the top of the page pencil out a 8cm x 3cm box in the centre of the page. Inside this area do the same block style lettering as from our Ta-Dah section
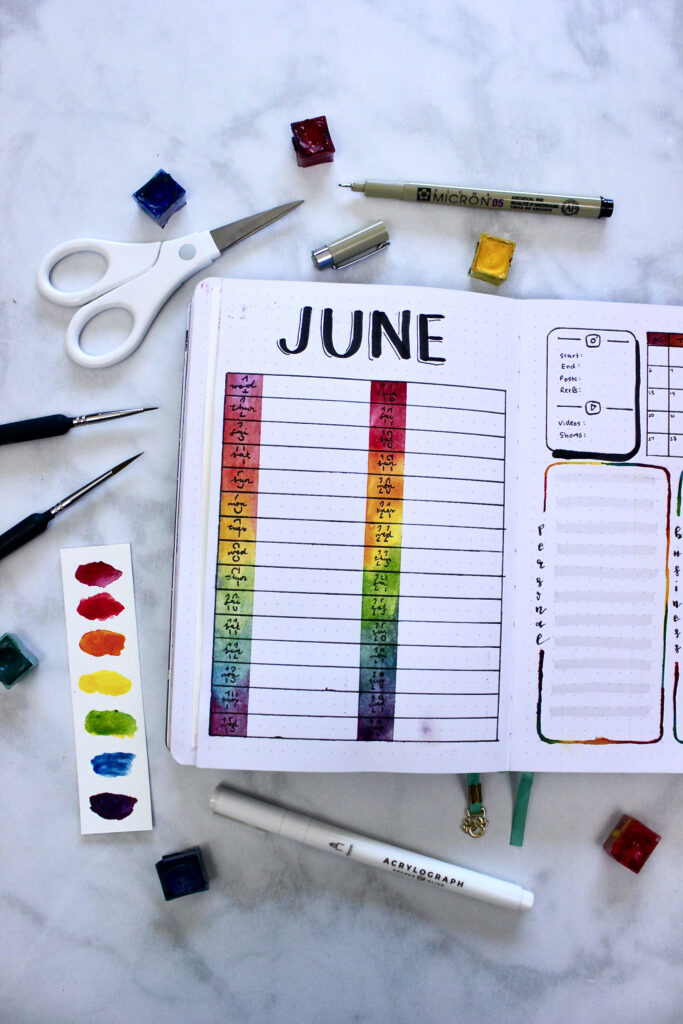
For the monthly calendar I created a box outline of 12cm x 15cm centred on the page, with the bottom line of the box 1 cm from the bottom border. Keep in mind that in this particular plan with me I decided to use a Dutch door AND tabs, so the dimensions on my page are now 13cm x 21.5 cm. You may need to adjust based on the size of your page and how much space you want to write down your monthly tasks. Inside that border, each individual box is 6cm X 1 cm; totalling 30 equal sized boxes. The tricky part for this particular layout is if you want to use it for a 31 day month. My tip for that would be to create 32 equal boxes and fill in the extra one box with a quote, doodle or leave it blank!
Let’s break down the gradient inside of the monthly calendar. First mark off 1.5cm in from the left side of the individual box outline. Next using your washi tape (this is going to just get discarded so don’t use your favourite!), tape out 1.5cm x 15cm; make sure to REALLY push that tape down so none of the watercolour will get through and you’ll end up with a crisp line. After the setup is complete it is now time to add the watercolour!
Here’s the thing. Although Archer & Olive journals have 160 GSM paper (thicker than a “normal” journal paper) it is not watercolour paper (they do have specific journals for though so if you want to get one make sure to check them out!). So, the pigment will get absorbed faster AND if you use too much water the page will crinkle up. So be mindful of this when handling the next step! If you haven’t already make sure your watercolour colours are wet and ready to use. Next, lightly water inside the two areas marked off with the washi tape. This will help blend the colours together quickly on the bullet journal paper. Finally add the colours in the order as desired.

Once fully dried now is the time to go in with the dates overtop using the Micron 03 pen. I took it an extra step and did a lettering style where the numbers are behind the day of the week. To make this, start with the day of the week in a small cursive leaving room at the top and bottom so you have space for the next step.
For the numbers in the background, the way I think of it when creating is by starting the number at the top and lifting your hand when it passes over top of the day of the week. I still continue the motion through to make sure my lines look like they would be connected if the word in the centre wasn’t there.
A trick to get around this if to block off the area with tape of a piece of paper. That will help you write the full number out without going over top of what was written. If you’d rather something different… do it! Use your creative freedom to switch stuff up.
Business Calendar
Supplies
amzn.to/38U4u8Z(opens in a new tab)
- Arteza Watercolours
- Cadmium Light Yellow A101
- Cadmium Light Red A200
- Amaranth A401
- Prussian Blue A504
- Deep Ocean Blue A501
- Round Brushes, 00, 5
- Micron Pens, 03, 05, 08
- Tombow Brush Pens, N15,
- Washi Tape
How To Create
From top to bottom we have the stats keeper, mini calendar and note sections for personal/business.
Starting off with the stats keeper. Since one of my focuses for the month of June is to be more in tune with the performance on both my Instagram and YouTube platform, I created a 4cm x 5.5cm box to house this information. This can ALWAYS be switched out to fit your lifestyle and needs better (quote, goals sections, favourite meal, song, number of books read etc.).
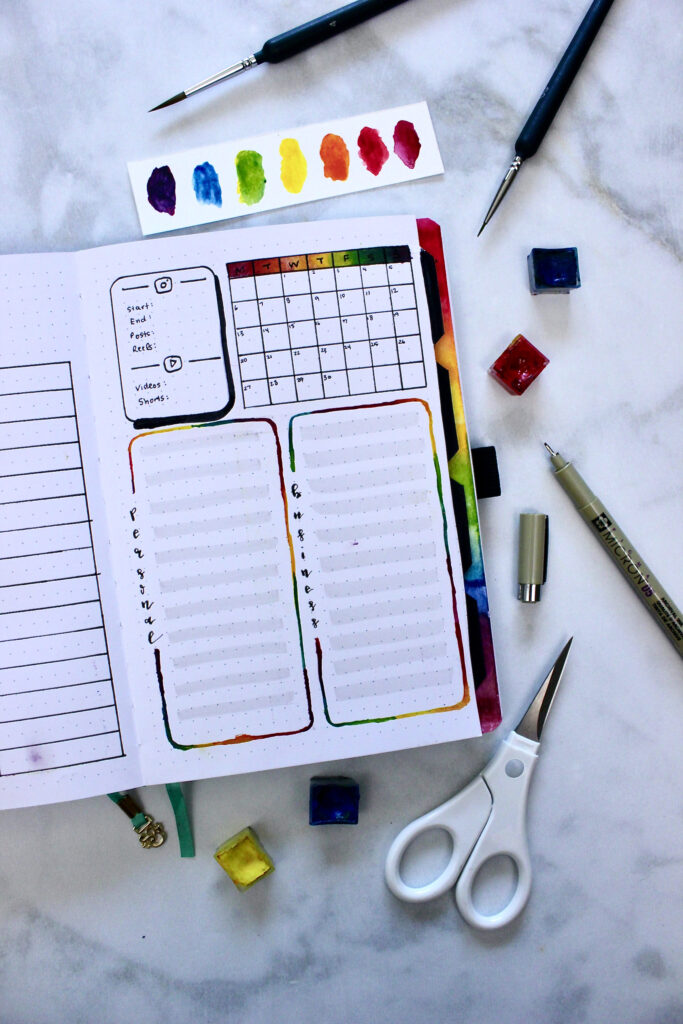
For the mini calendar I first outlined a 7cm x 5.5cm box using a Micron 08 pen. Inside the horizontal lines were 0.5cm for the top line (Monday – Sunday section) and 1cm for each box following. This calendar is SMALL… I know… BUT it is not meant to track the tasks that I want to get done in words, instead I’ll being using images, coloured dots and as a visual reference for all my business related tasks. Things like postings, shop updates and project deadlines. The pens used for the Monday – Sunday and numbers were the Micron 05 and 03 pens respectively.
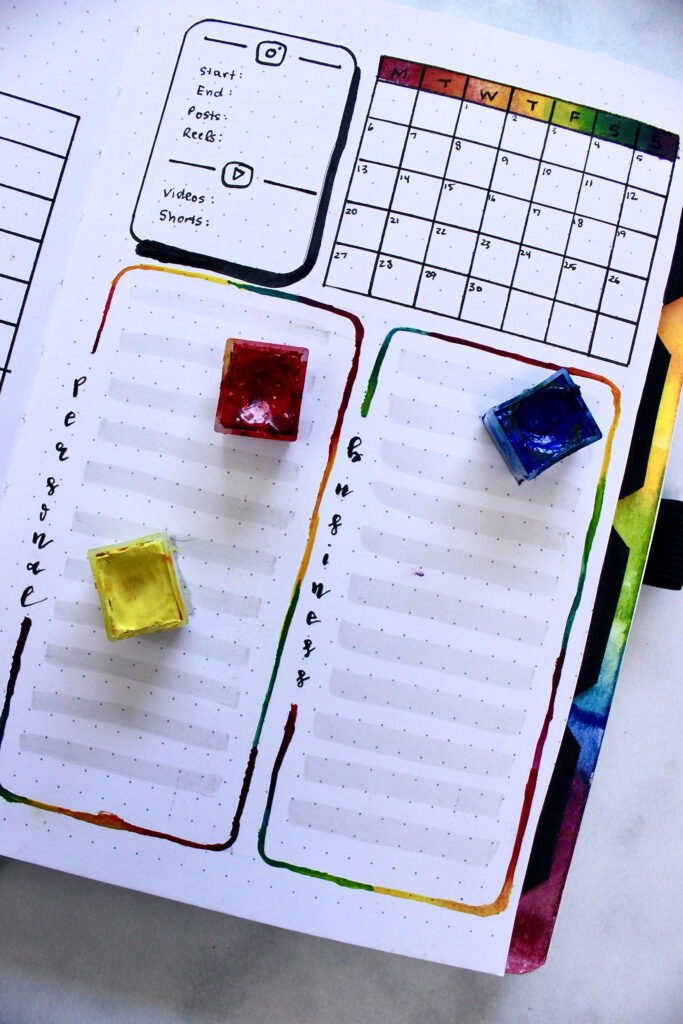
Finally, are the Personal and Business boxes! Start with penciling out a 5.5cm x 12cm for each as a guide. I took it up a notch by making these gradient watercolour lines in the small colour pattern as before, using a small detailed brush in size 00. I went SLOW to make sure my lines were not super wonky looking at the end. I centred the lettering on the left vertical line using my Tombow Fudenosuke soft tip black pen. To end off the page I used the Tombow N89 dual brush pen to colour every other line inside each box.
Content Calendar/“Habit Tracker”
Supplies
- Arteza Watercolours
- Cadmium Light Yellow A101
- Cadmium Light Red A200
- Amaranth A401
- Prussian Blue A504
- Deep Ocean Blue A501
- Round Brushes, 00 5
- XL Canson Watercolour Cold Press
- Micron Pens, 03, 05, 08
- Tombow Fudenosuke Soft Tip Black Pen
- Tombow Brush Pens, N15
- Crafter’s Tape (or glue stick)
- Paper cutter/Scissors
- Washi Tape
How To Create
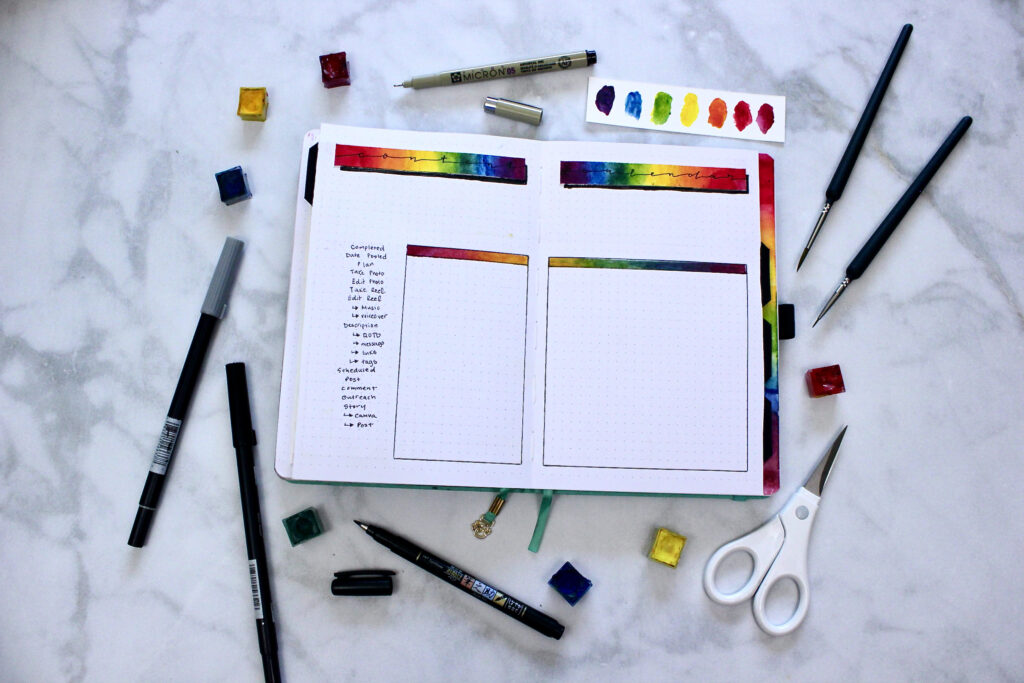
On a separate watercolour paper, pencil out 11cm in length and create a gradient. For the remaining sections unless otherwise mentioned, we are going to be using same technique for all of the title pages to make life easier and reduce the time waiting for everything to dry. I created a block of watercolours with the same length across all the way down the watercolour paper. This way all I need to do was cut off the width for each title section.
Using my paper cutter, I cut each title to be 1.25cm in width and with the crafters tape stuck it in at the top of the journal.

Using the Tombow Fudenosuke soft tip black pen, I created a dainty cursive lettering, lifting my pen after each letter for more control on spacing and size. To finish off our titles I added in a black drop shadow using the Tombow N15 dual brush pen.
For the rest of the page it looks very similar to habit trackers that I’ve done before in the past. If you don’t track your content, this spread can be switch out for habit tracking or any other item you do where there are repetitive tasks you want to complete (morning routine, monthly house cleaning, assignment tracker, grade tracker for your students, etc.). Using the Micron 08 pen, I created a 7cm x 12cm and 11.5cm x 12cm box on the left and right page respectively. The top line of this box used the washi tape and gradient trick mentioned in the monthly calendar section.

The tasks along the left side of the left box are specifically in relation to the tasks I want to complete for my Instagram posting. However, you can switch this out to make it for whatever you want to track, using the dates and specific habits.
Business Brain/Goal Planner
Supplies
- Arteza Watercolours
- Cadmium Light Yellow A101
- Cadmium Light Red A200
- Amaranth A401
- Prussian Blue A504
- Deep Ocean Blue A501
- Round Brushes, 00, 5
- XL Canson Watercolour Cold Press
- Micron Pens, 03, 08
- Tombow Fudenosuke Soft Tip Black Pen
- Tombow Brush Pens, N15, N65 (All from grey scale pack)
- Crafter’s Tape (or glue stick)
- Paper cutter/Scissors
How To Create
From our watercolour page created in the Content Calendar section, I cut out a 11cm x 2.5cm box and a 11cm x 1 cm box. These will be used for the “Business Brain” title and our three categories for our goals. Centre the larger box at the top of the page and glue down. Add a drop shadow and label accordingly.
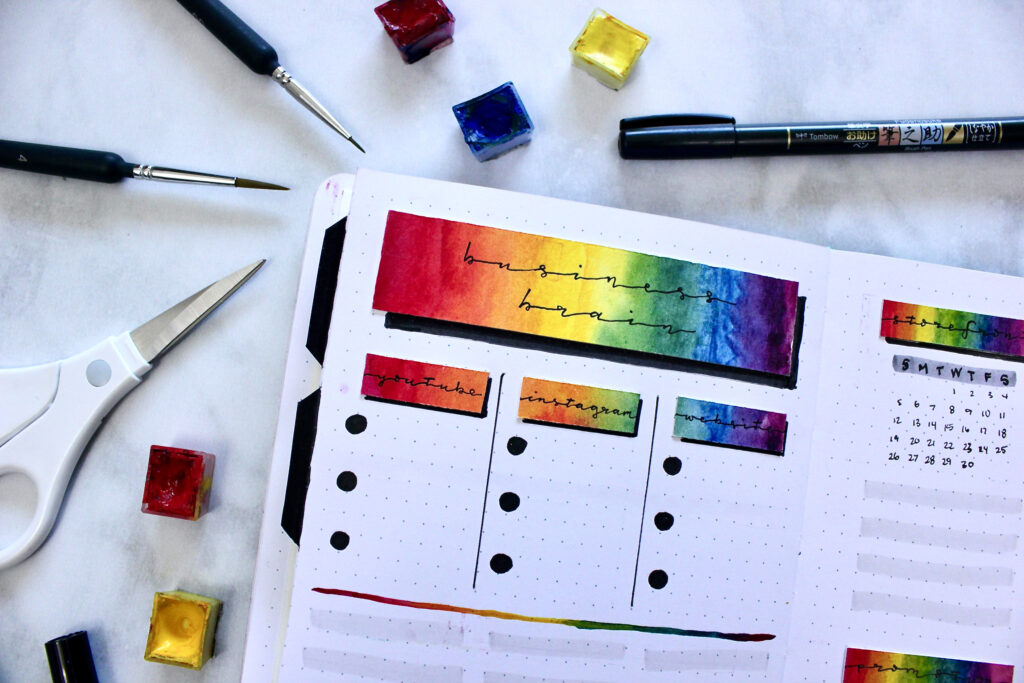
Underneath the top box, leave a 1cm gap. Using scissors, cut the 11cm x 1cm box into 3cm long sections from the centre, making sure to leave the red and purple on the outer sides uncut. We want to match the top gradient box to these ones below. Using a Micron 08 pen, I added a dividing line in between the three goal sections. For me personally I like having 3 goals (easy, medium and hard) for each category. With my Tombow N15 dual brush pen, I coloured a black circle every 1.5cm.
The top and bottom sections are divided with a gradient watercolour line. The section below will be dedicated for tasks to do that specifically relate to accomplishing each goal. That way it’s all on one page and I don’t have to think too much about what I have to do. The easier I can make it for myself the more likely it is I will accomplish it.
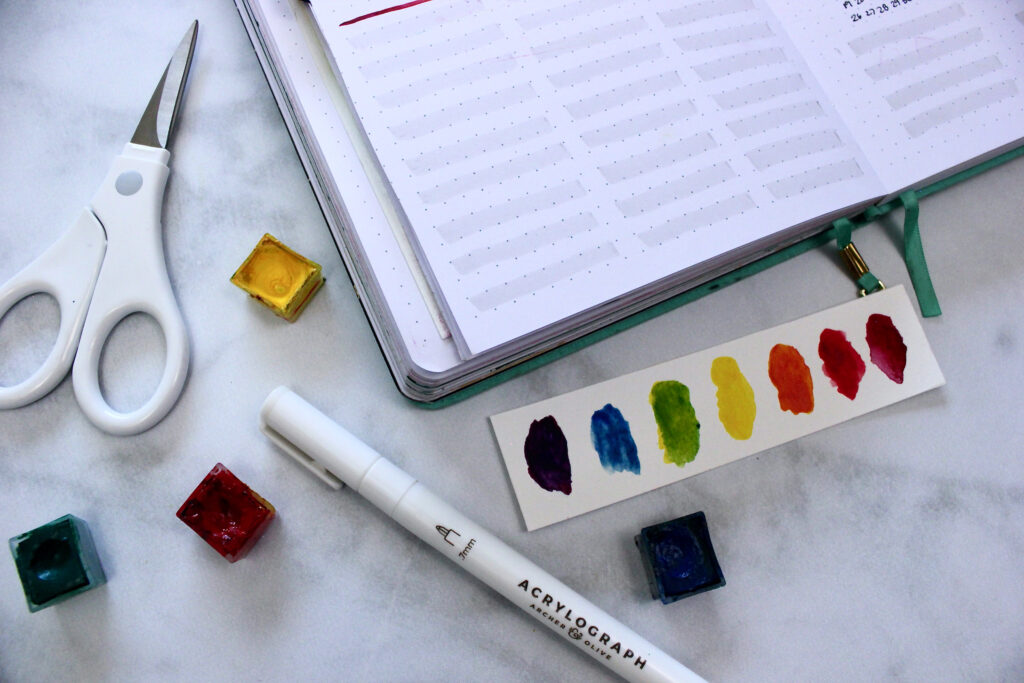
Since my eye needed better division of each section I used the Tombow N89 dual brush pen to colour in every other line.
Business Habit Tracker
Supplies
- Arteza Watercolours
- Cadmium Light Yellow A101
- Cadmium Light Red A200
- Amaranth A401
- Prussian Blue A504
- Deep Ocean Blue A501
- Round Brushes, 5
- XL Canson Watercolour Cold Press
- Micron Pens, 03, 05
- Tombow Fudenosuke Soft Tip Black Pen
- Tombow Brush Pens, N15, N89, N65 (All from grey scale pack)
- Crafter’s Tape (or glue stick)
- Paper cutter/Scissors
How To Create

In the past I have had a love hate relationship with habit tracking. It was motivating to see what I accomplished, when I was consistent, but almost harmful in a way too because I would end up feeling bad if I missed a day or two; end up spiraling down and ignore the tracker/habit for the rest of the month. This time around I am doing it differently! I am using this tracker more as a when did I do it last to make sure I stay on top of the tasks that I need to get done in getting products out for people to enjoy.
First, I divide the page into 4 equal sections; each section is going to be the exact same with the only difference being the title of the habit. Each watercolour gradient title is 4.5cm x 1cm with a black drop shadow underneath. These are centred and glued at the top of each quarter section.

Underneath is a mini calendar, which I love using for visuals BUT you can save time by either using stickers or stamps. Since the box above is 4.5cm and the S, M, T, W, T, F, S section is 3.5cm, I left 0.5cm on either side and centred it underneath the title. I used the Micron 05 and 03 pens for the days and dates respectively.
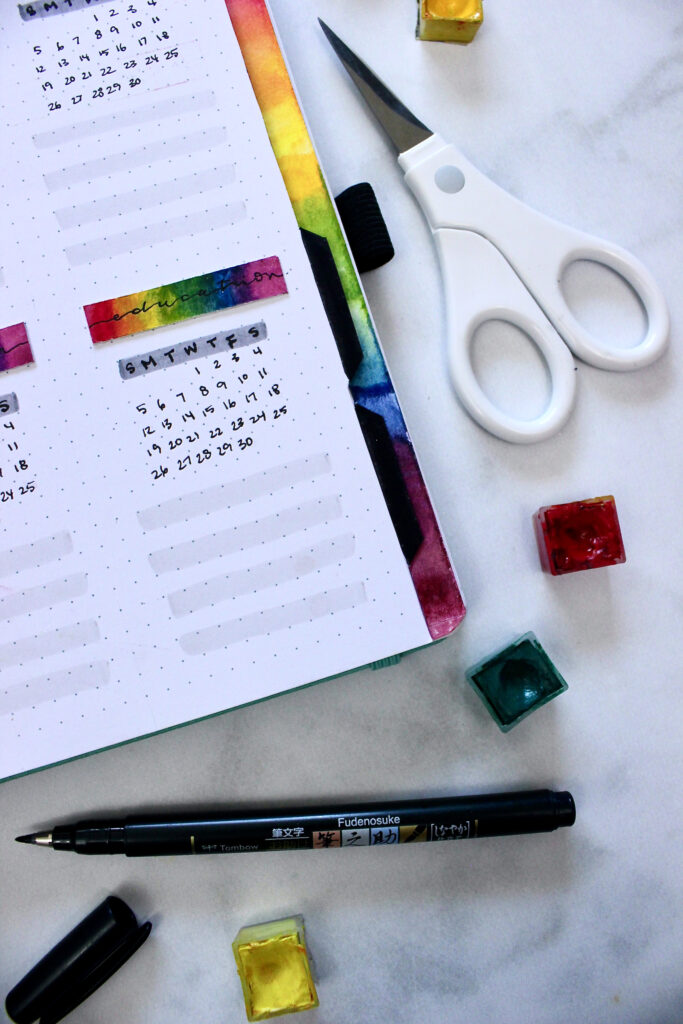
Skipping a line underneath the mini calendars left me room to write down the tasks I want to do specifically relating to that habit. To add some separation to this area I came in with my Tombow N89 brush pen and coloured in every other line.
Walking Tracker
Supplies
- Arteza Watercolours
- Cadmium Light Yellow A101
- Cadmium Light Red A200
- Amaranth A401
- Prussian Blue A504
- Deep Ocean Blue A501
- Round Brushes, 00, 5
- XL Canson Watercolour Cold Press
- Micron Pens, 03, 08
- Tombow Fudenosuke Soft Tip Black Pen
- Tombow Brush Pens, N15
- Crafter’s Tape (or glue stick)
- Paper cutter/Scissors
How To Create
Remember how I said I have a love hate relationship with walking trackers? Here is how I get around the issue that I face of seeing a tracker that’s not completely filled out. Instead, I switch up the layout and track how much I do of that one particular habit.
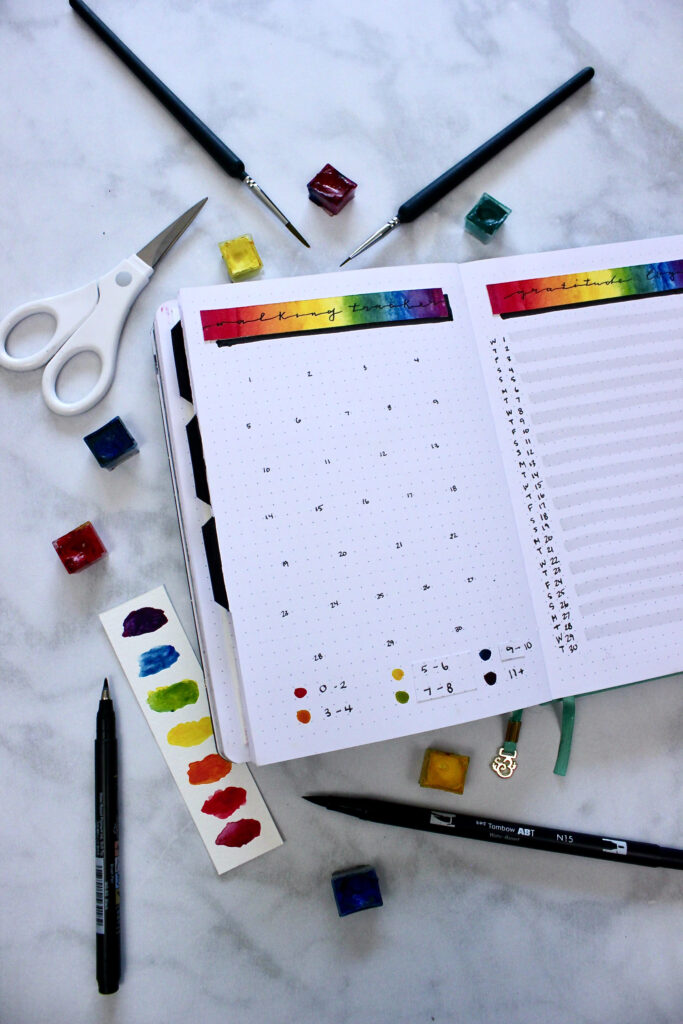
For my walking tracker I use the same method as before to create my title. The majority of the page looks blank right now; however, what you’ll end up seeing on my Instagram if you follow me over there is what it will look like completed. I have sectioned out the page into seven evenly spaced horizontal lines, leaving 2.5cm at the bottom to write in our legend.
The number of days in each line alternate as follows 4, 5, 4, 5, 4, 5, 3, totalling 30 day. I used the Micron 03 pen to write out each number. These will be filled it will paint splatters for each day depending on how many steps I got. That is dictated by the legend at the bottom. I broke the number of steps into 6 categories for every 1,000 steps walked.
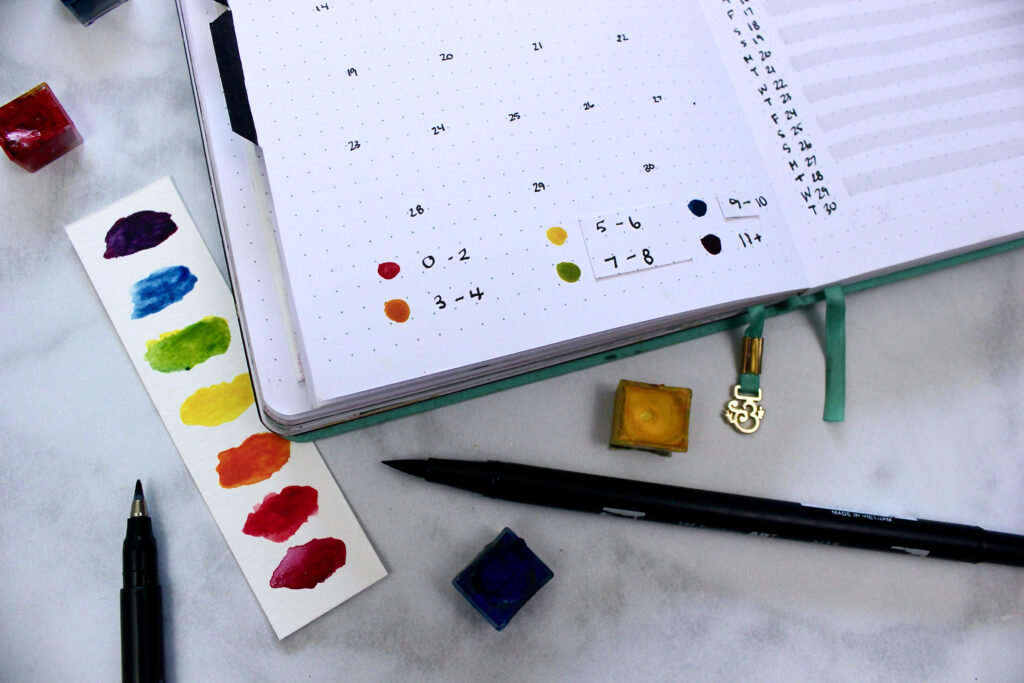
Red = 0 – 2
Orange = 3 – 4
Yellow = 5 – 6
Green = 7 -8
Blue = 9 -10
Purple = 11+
Gratitude Log
Supplies
- Arteza Watercolours
- Cadmium Light Yellow A101
- Cadmium Light Red A200
- Amaranth A401
- Prussian Blue A504
- Deep Ocean Blue A501
- Round Brushes, 5
- XL Canson Watercolour Cold Press
- Micron Pens, 05
- Tombow Fudenosuke Soft Tip Black Pen
- Tombow Brush Pens, N15
- Crafter’s Tape (or glue stick)
- Paper cutter/Scissors
How To Create
After creating the title using the pervious methods mentioned, I wrote out both the day and number for each day in June on the left hand side of the page using the Mircon 05 pen. I left one line to write down what I was grateful for that day instead of my usual two. This month I decided that I want a specific section to highlight the things that brought me joy under my reflection tracker area.
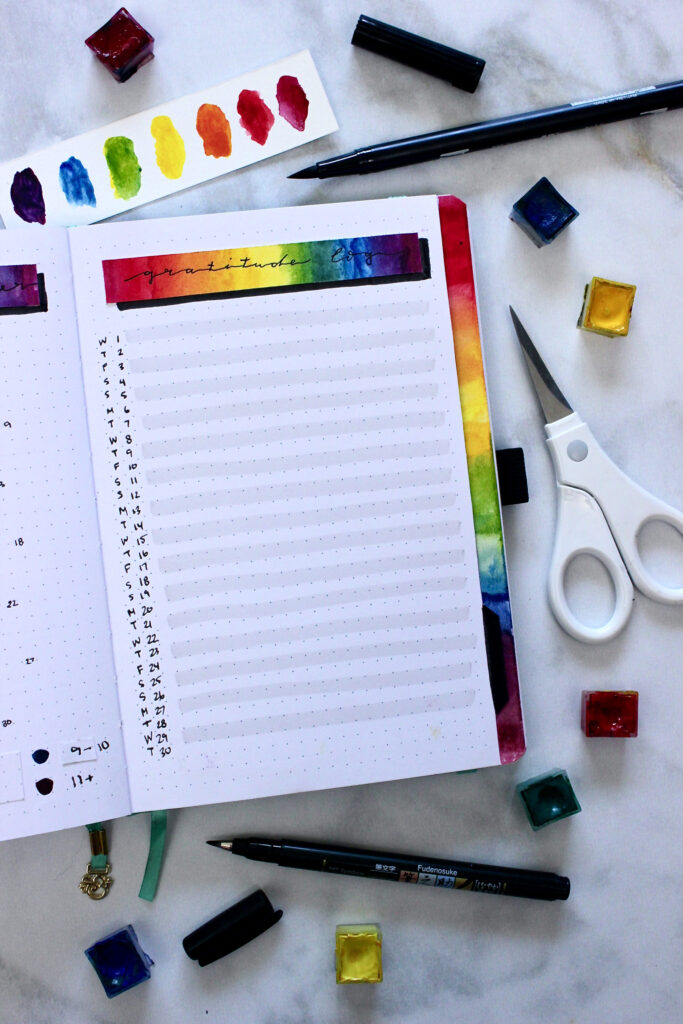

To make sure I don’t get confused with what day is which I coloured in every other line using the Tombow N89 dual brush pen. This tracker may look simple now however after each day of writing something in it will look like my most filled in page this month.
Reflection Tracker
Supplies
- Arteza Watercolours
- Cadmium Light Yellow A101
- Cadmium Light Red A200
- Amaranth A401
- Prussian Blue A504
- Deep Ocean Blue A501
- Round Brushes, 5
- XL Canson Watercolour Cold Press
- Micron Pens, 03, 05, 08
- Tombow Fudenosuke Soft Tip Black Pen
- Tombow Brush Pens, N15, N89
- Crafter’s Tape (or glue stick)
- Paper cutter/Scissors
How To Create
From our gradient watercolour paper cut out an 11cm x 3cm box and five 11cm x 0.75cm boxes. The larger box will be used for our reflection tracker title, while the smaller boxes represent each week in June. By using the same lettering styles for this header as our previous ones, it will help the over all theme work together a little more cohesively.

On the left page, glue in the reflection tracker paper gradient and add a drop shadow. Underneath this, I dedicated the whole page to writing, drawing, or scrapbooking in different things that brought me joy.
Using both the Micron 08 pen and Tombow N89 dual brush pen I created the questioned “what brought you joy?” and centred It on the page. To finish off the left hand side, I added a border in black with one thick and thin line, matching our June and Ta-Dah lettering.
The right page I divided into 5 equal sections, 3.5cm apart from top of one weekly title to the next. Here is where I will write a few sentences on my thoughts, feeling and activities that made up my week.
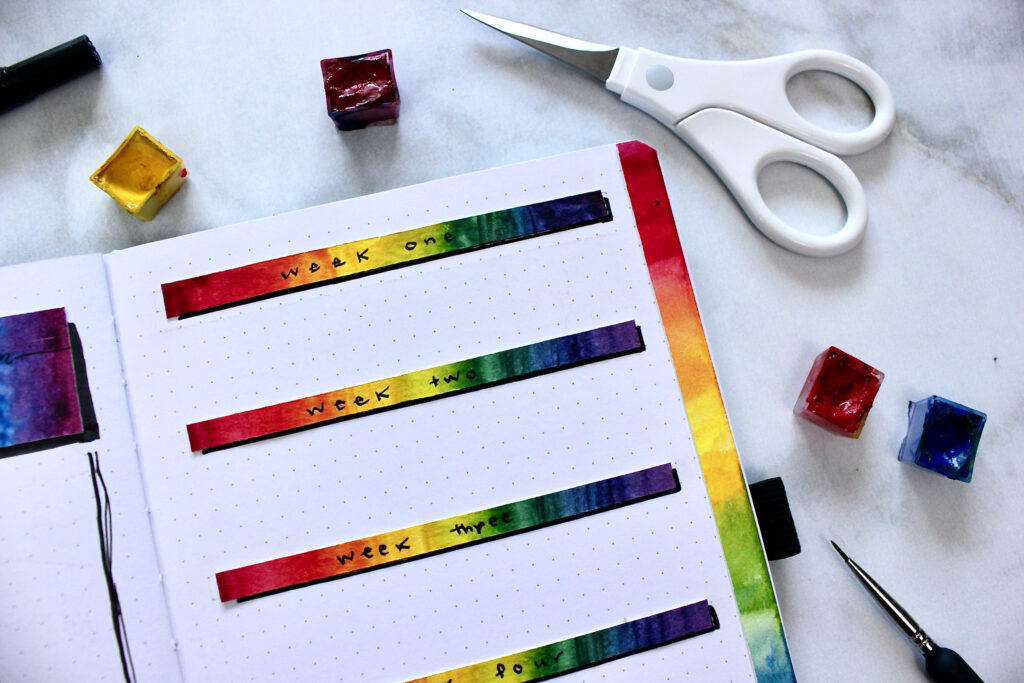
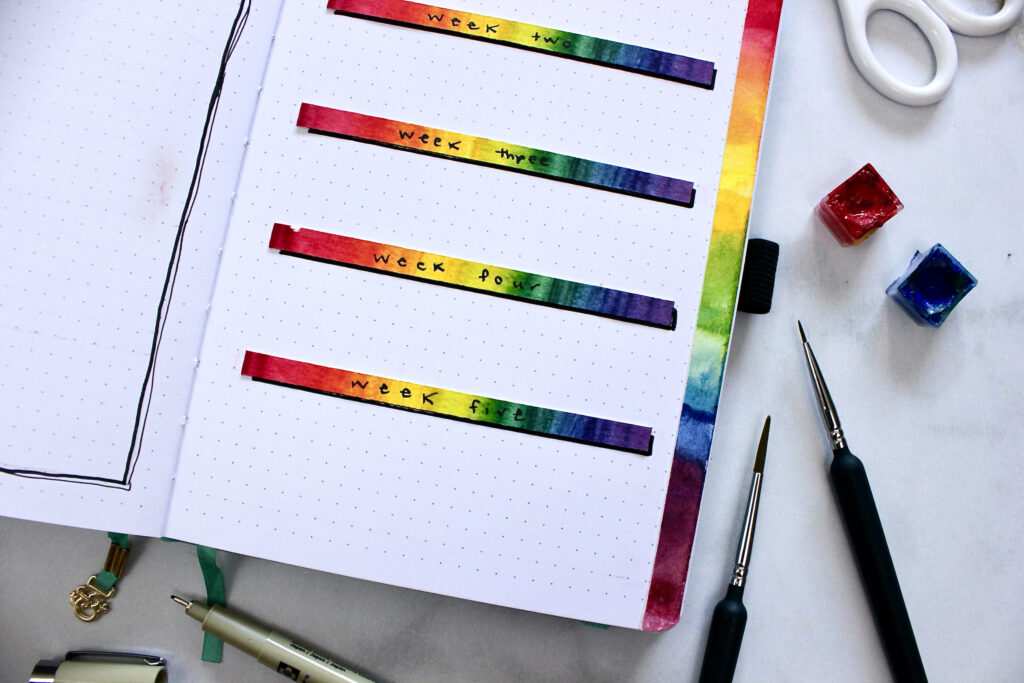
This is a spot where I can truly be vulnerable and get me back into focus on how I want the following week to go. It was BEYOND helpful to me in May for getting in touch with everything and moving in the direction I needed.
The furthest right line is part of the Dutch door watercolour gradient paper. This helps the black tabs for each section have something to back up on.
Weekly Spread One
Supplies
- Arteza Watercolours
- Cadmium Light Yellow A101
- Cadmium Light Red A200
- Amaranth A401
- Prussian Blue A504
- Deep Ocean Blue A501
- Round Brushes, 00, 5
- XL Canson Watercolour Cold Press
- Micron Pens, 03, 05, 08
- Tombow Fudenosuke Soft Tip Black Pen
- Tombow Brush Pens, N89, N65 (All from grey scale pack)
- Crafter’s Tape (or glue stick)
- Paper cutter/Scissors
How To Create
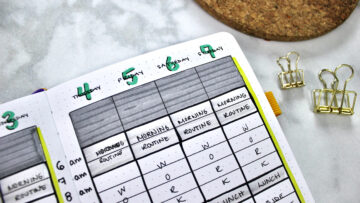
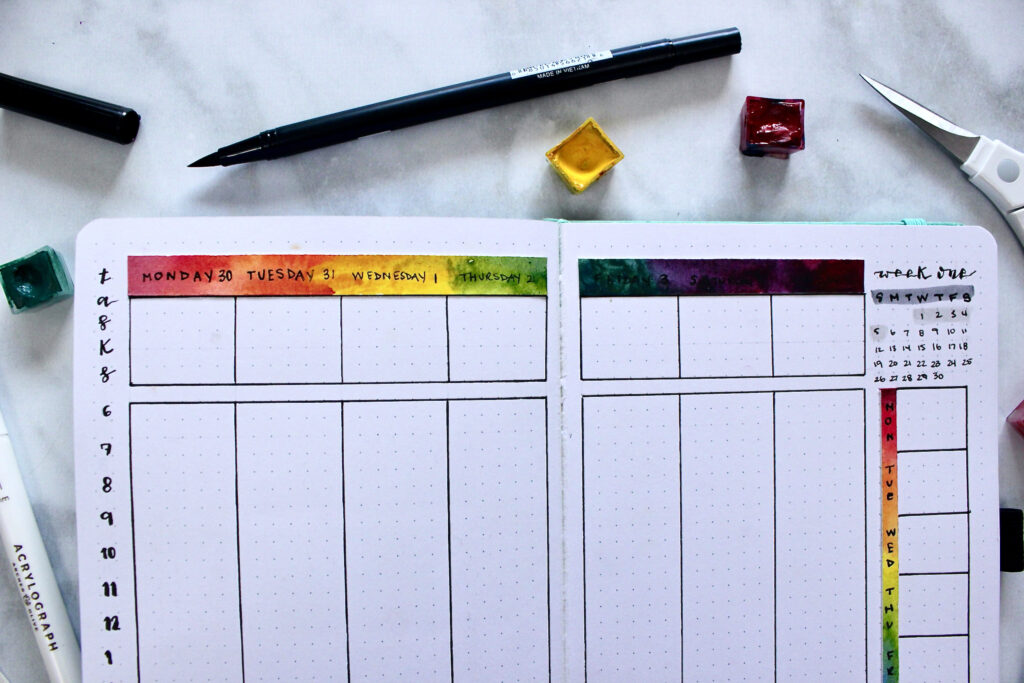
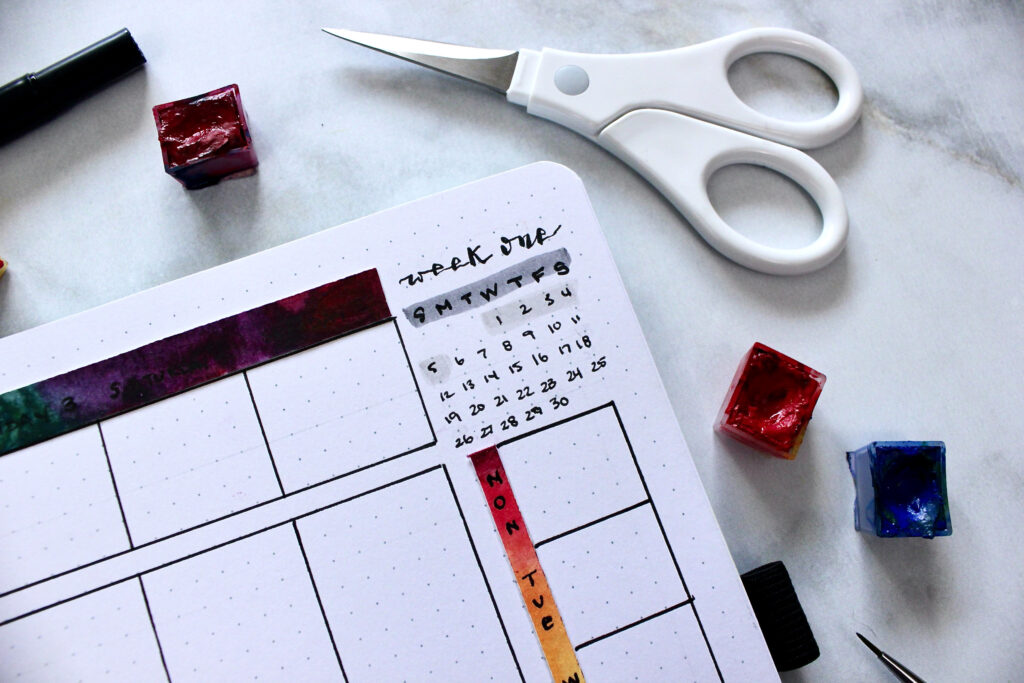
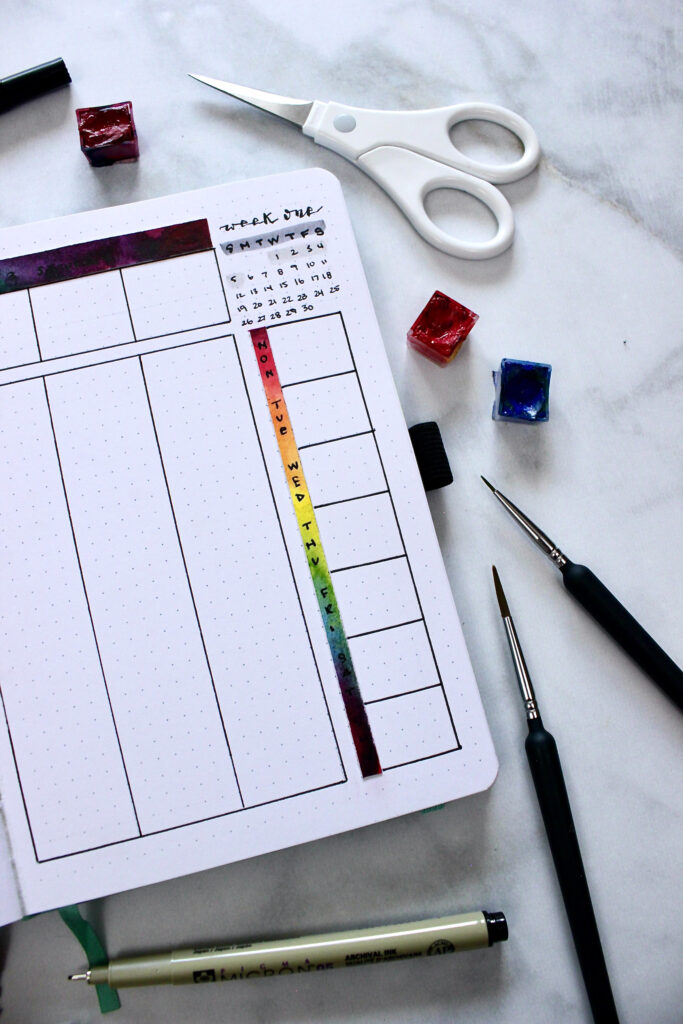
The weekly spread is broken up into 3 different categories: the top tasks, the hourly breakdown, and the right side bar.
First let’s start with the top tasks. Each box is 3cm x 2.5cm NOT including the top watercolour paper. The watercolour gradient is 21cm x 1cm, cut at the 12cm mark to be divided across the left and right pages. Using my Micron 05 pen I wrote out Monday to Sunday over top of each box. This top task section is going to help focus me in on how I want to spend the hours throughout my day, ensuring I stay on track with my work goals.
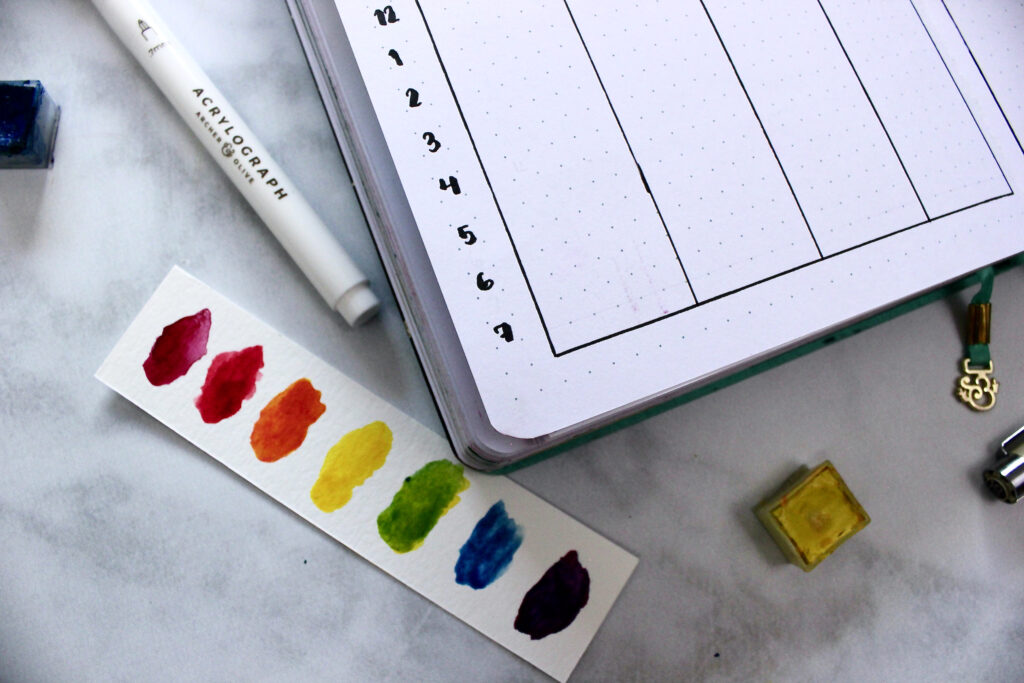
That leads to the second section, the hourly breakdown. I first came in with my Micron 08 pen and created individual 3cm x 14cm boxes. The hours for the day are written out using the Tombow Fudenosuke soft tip black pen on every other line. This means that each dot space represents a half hour increment. It’s been a LONG time since I last used this spread but since I am transitioning fully into content creating, I want to have the day laid out completely to avoid wasting time.
Finally, is the right side bar; at the top of this is a mini calendar. I used my Tombow Fudenosuke soft tip black pen for the “week one” title and the Micron 03 and 08 pens for the letters and numbers below. After highlighting the Sunday to Saturday with the Tombow N65 dual brush pen and the numbers one to five with the Tombow N89 dual brush pen, I created the mini boxes below. Each box is 2.5cm by 2cm NOT including the watercolour gradient paper (this is 0.5cm x 14cm). Each section will represent the day’s task specifically related to my business goals, but you can use it for whatever fits your life.
Weekly Spreads Two to Five
If you are curious what my other weekly spreads look like I post the before and after shots on my Instagram or bullet journal flip through on my YouTube channel!
