
What is block scheduling?
Block scheduling is planning your day in different sections based on the categories of your life. It helps avoid jumping around from task to task, the feeling of overwhelm and overall increases your productivity like no other system I have used before.
How to create different blocks?
A block is based on different categories of your life and what you’d like to accomplish in a day. A perfect example is a cleaning block; everyone has to do this sometime or another. Within this block I would dedicate tasks only associated with cleaning.
- Dusting
- Vacuuming
- Dishes
- Laundry
- General Tidying
The number of blocks created will be dependent on what makes the most sense to you and your brain. For example, work can be broken down into many categories to help increase productivity throughout your day. Category one could be based on administrative tasks, another escalation, and finally upcoming projects. Each category would then have sub-tasks to accomplish just like our cleaning example from above.
Keep in mind blocks of your life like a morning or evening routine, lunch breaks and sleep times. Although it doesn’t naturally make sense (to me at least) to include these things, after using and adjusting this system to fit my needs I can say it is a must!
How it has impacted my life:
Block scheduling has allowed my brain to not fatigue on the never ending task of choosing what I should be doing at any moment in time. By grouping likeminded tasks together my brain can fully focus on one section of my life at a time. Meaning since I can be fully present on one thing I actually end up getting more done during the day, week, month and year!
Tips
Keep your blocks between 1.5– 3 hours
Over the last couple months of trying this method I have noticed two things; one my mind requires a warmup period and two it has a cap on the focus it is willing to give. Having blocks that are lower than 1.5 hours didn’t allow for me to gain any momentum on the tasks within a block. By the time I found my groove it was all too soon that the time was up and I was needing to move onto the next thing.
Likewise, when I had a time over 3 hours my brain would start to wander… “okay I have worked long enough, we should see what’s happening on social media”. Neither over booking or under booking were really helping me accomplish the goals that I wanted to get done.

Use a timer to indicate the end of the block
I found this to be SOO beyond helpful in the beginning. What I noticed was I was either looking at the clock to see that I hadn’t gone over my time or I went over and felt discouraged because I was behind. Avoid that all together by putting a timer on your phone, watch, microwave, or oven. If you think it will be too easy to turn off make sure whatever device you are using is out of range and forces you to get up from your seat.
Plan out EVERYTHING, no time goes unscheduled
Things like breakfast, lunch, dinner, and sleep should not be unscheduled. What I do for these is fit it into a morning or evening block. It can look a little something like this:
Morning block
Breakfast
Get ready
Plan out day
Walk
Feed Dog
Read
Different stages of life require different planning
Where you are in your life and the different factors that influence your life will impact the way you schedule your time. A new mom will need to work around their child, a student around their classes, a business owner around their client, not every day may look the same, but you’ll begin to notice a routine within each category. For example, when I got a new puppy my block times were shortened to match up with the many bathroom breaks he required. But now that he is older and has a stronger bladder those block times have lengthened.
Print out my downloadable schedule and start planning today!
Follow step 1 under getting started by printing off the ideal schedule template and begin planning today!
Before Getting Started
Now that you’ve printed out the download BELOW, it is time to fill them out!

Starting with the “categories” page look at your life and see where you spend your time, grouping together like minded tasks. Here are some category ideas to help get you started:
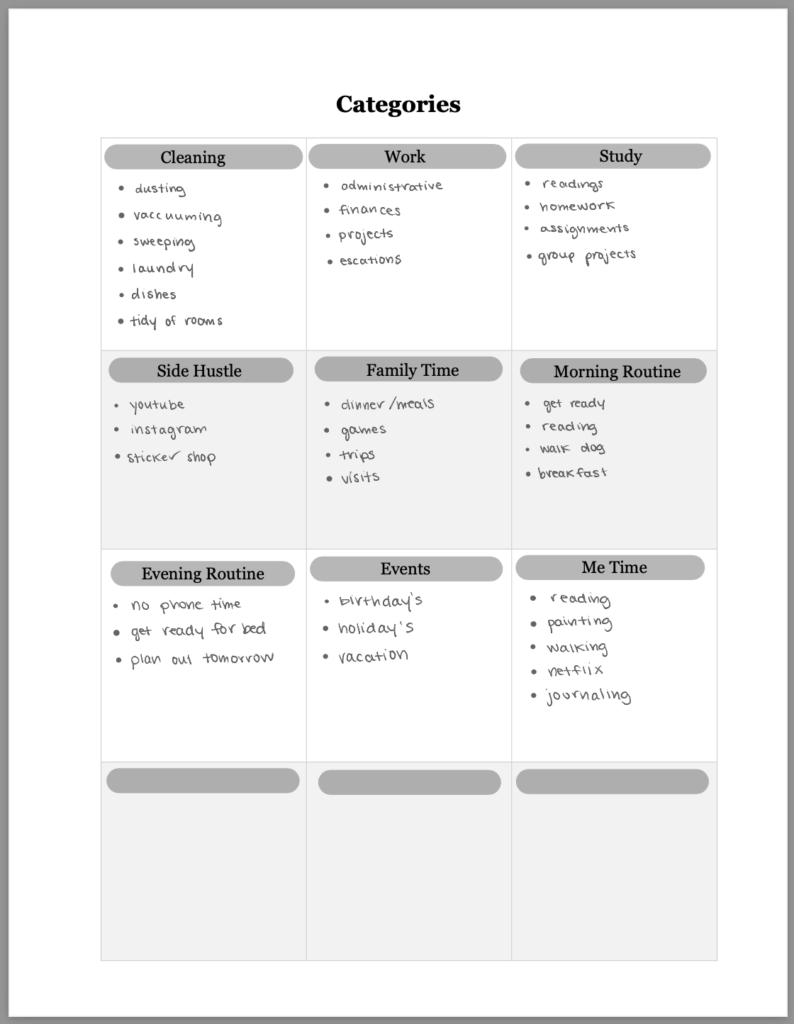
- Routines/Food (Morning, Evening, Lunch etc.)
- Students (study, classes, assignments)
- Me Block (workout, reading, creative projects)
- Cleaning block
- Work (administrative, projects, escalations)
- Family Time (Nap time, meals, trips)
- Events (afterschool practices, birthday’s, parent/teacher conference)
Not every category above may fit your life and there are SOO many options out there, those ideas are simply to get you started.
The next two sheets, “ideal weekly” and “ideal daily”, can both be used to fill out what your ideal day would look like using the categories above. If you have a similar structure to your days (ex. morning routine, work block, lunch block, work block, dinner block etc.) your days may only allow for variation early in the morning or after dinner is done. If that’s the case, you may not really need the weekly layout but instead use the daily.


If you are like me and work for yourself, or want to breakdown your workday like the example categories above, each day can look different. Therefore, I would recommend using the “ideal weekly” template. By all means you can print out both and use to your discretion.
These “ideal” templates are just that IDEAL. It does not mean that each week or day will look like this, we just want an idea of a starting point. If it fits into your schedule than that is perfect, if not it is 100% okay to adjust. You are not bound by a template.
Supplies
Archer & Olive Notebooks (use “createwithcait10” for 10% off)
Tombow Dual Brush Pens Tropical Pack
Tombow Dual Brush Pens Grey Scale
DISCOUNTS:
Archer & Olive – “createwithcait10” for 10% off
Time for Block Scheduling!
With our templates in hand, it is time to plan out our week! There are a few ways to lay this out in your bullet journal.
- Hourly Layout
- Block Layout
- Open Layout
Please gravitate to what you find the easiest and most beneficial to your life!
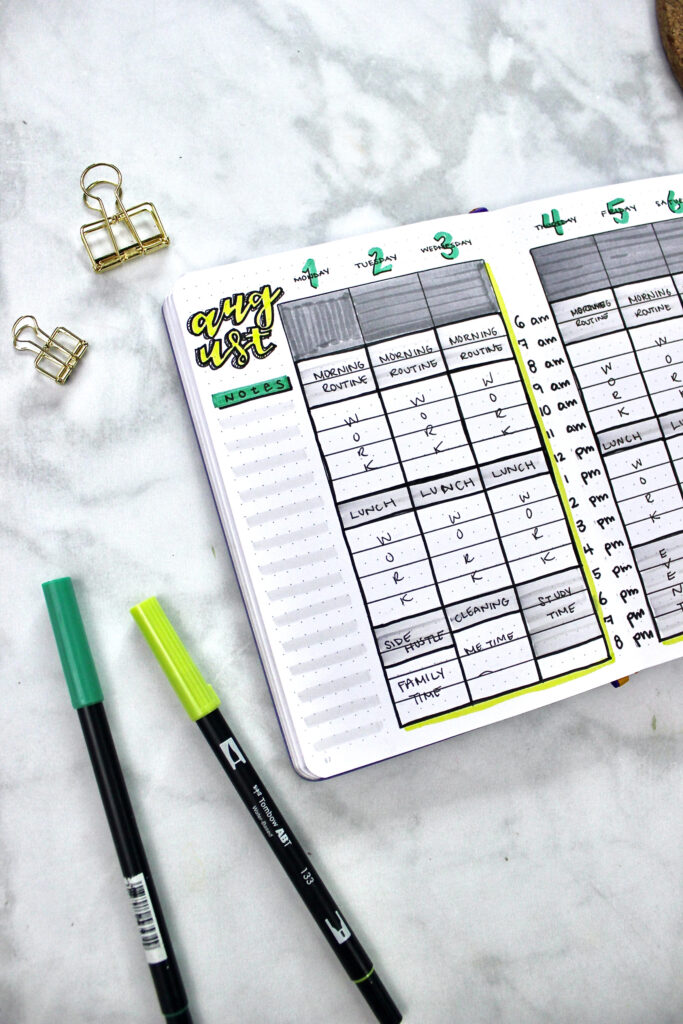
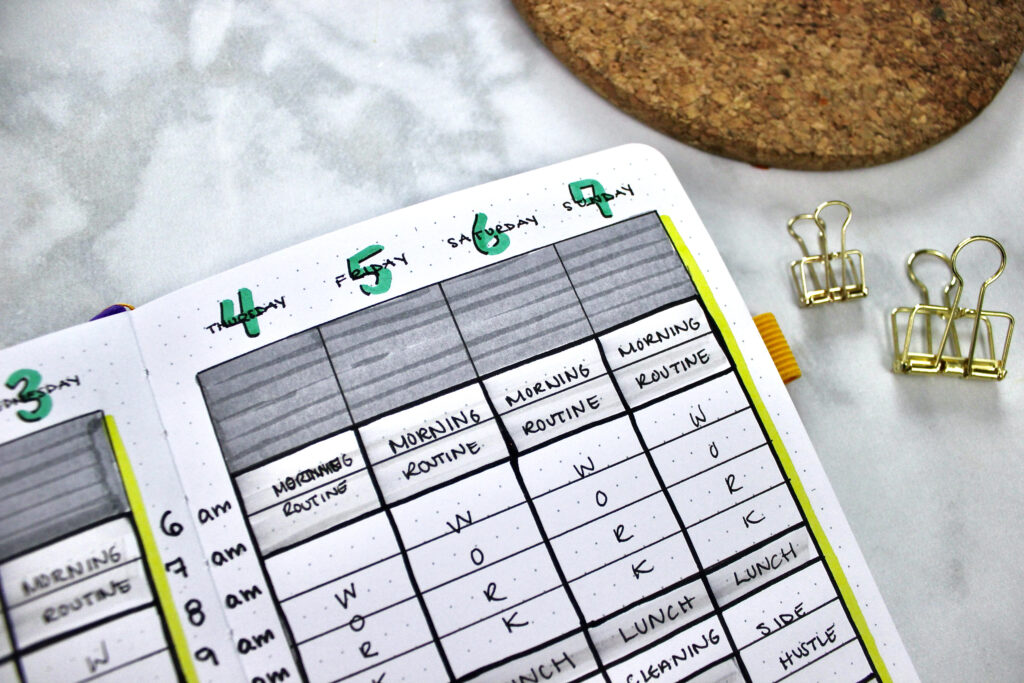
Hourly Layout
If you are the type of person who likes to have pre-designed structured layouts this is the best option! This method blocks off the page into 4 equal horizontal sections on the left and right page, leaving one section open to notes, tasks, or trackers. The hourly layout divides the page vertically into hourly segments from 6am – 8pm, leaving room for top tasks at the top of each column (adjust times based on your life needs).
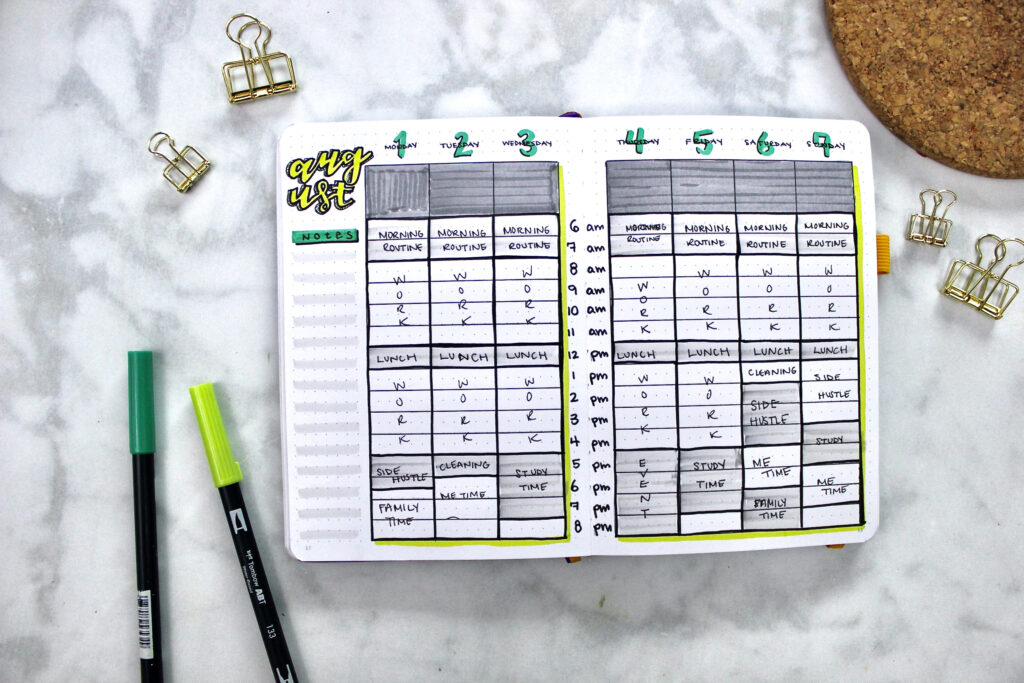
Using the “ideal” template and categories page, come in and fill out your day. I recommend doing things day by day because you could go overtime in categories, especially in the beginning, and I know I was discouraged having the wrong information written out for the remainder of the week.
When planning you may notice 4 of the 7 days match your ideal schedule, where the other 3 varied based on the activities you had in your life.
Pros:
- Easy to use templates
- Works best for people with consistent time blocks (6am – 8pm example)
- Provides most structure and least flexibility in planning
- Increases productivity
Cons:
- Takes the most time to set up
- Difficult to use for shift work
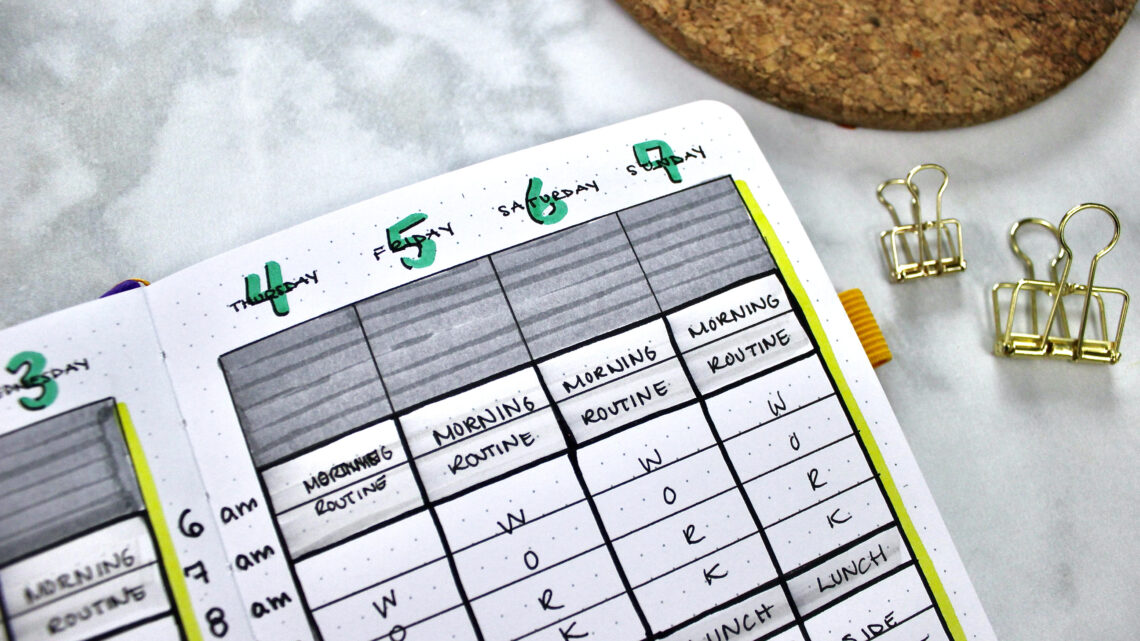
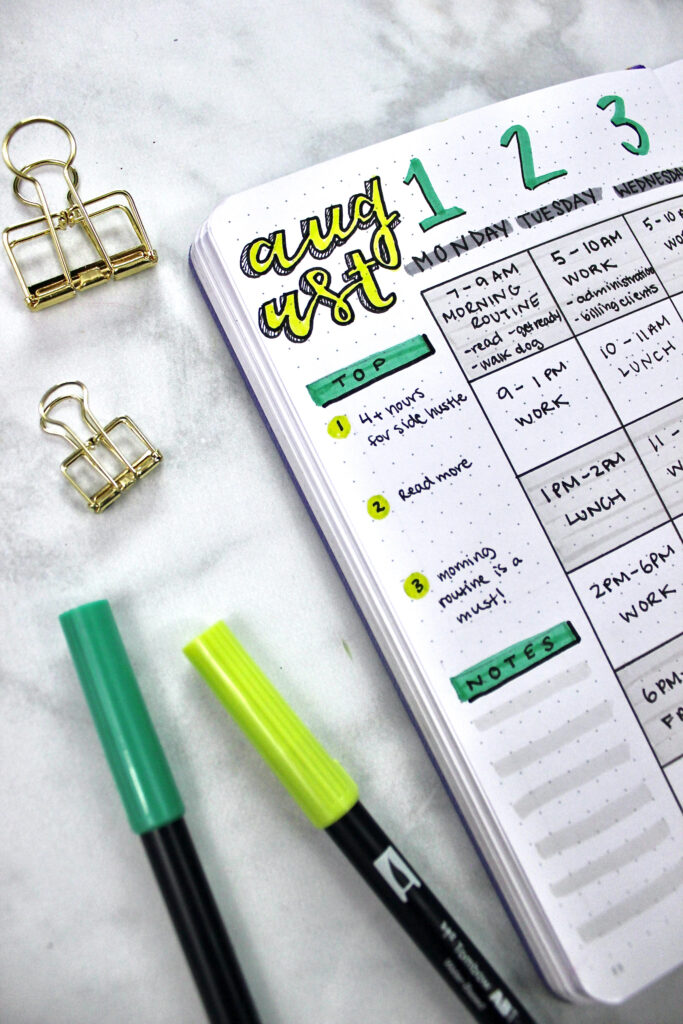
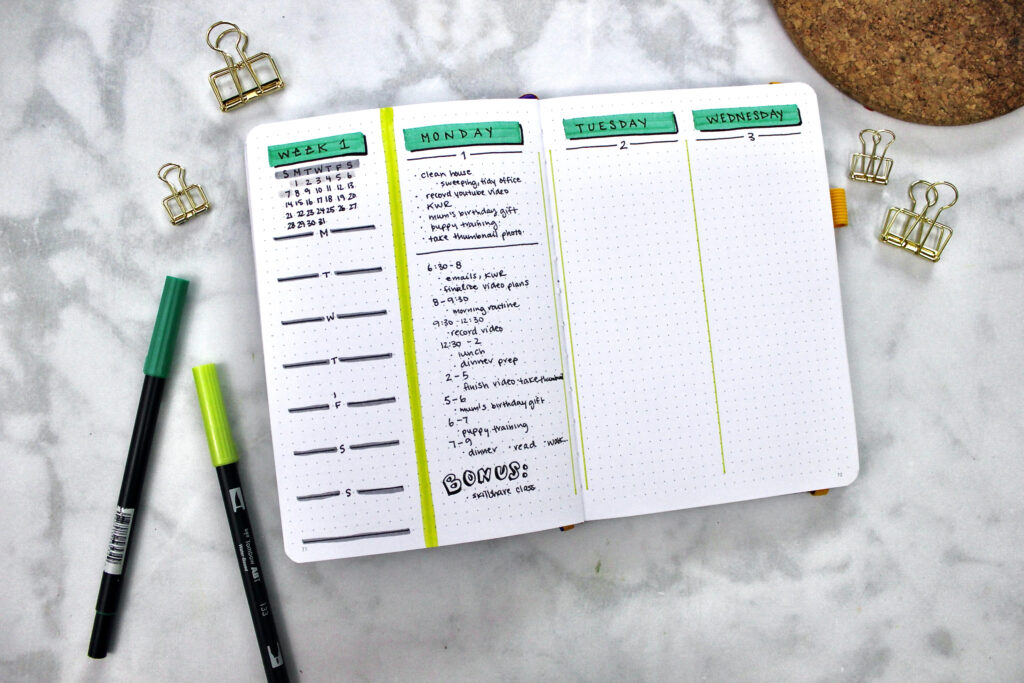
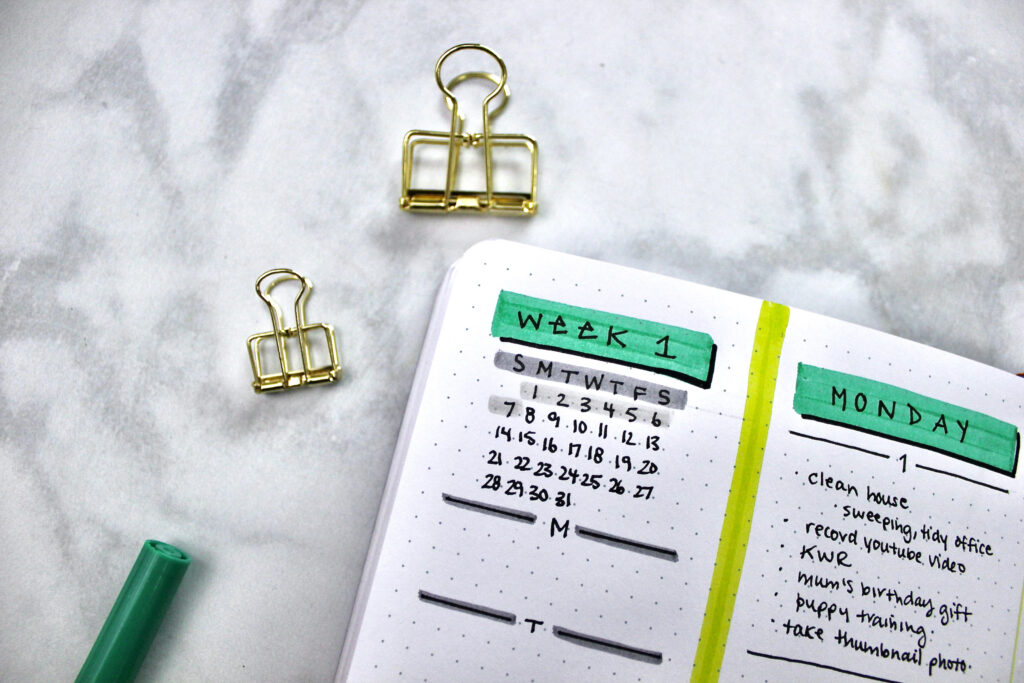
Block Layout
Maybe you don’t have the same time blocks because you do shift work or maybe the hourly setup takes you too long… here is where the block layout comes into play.
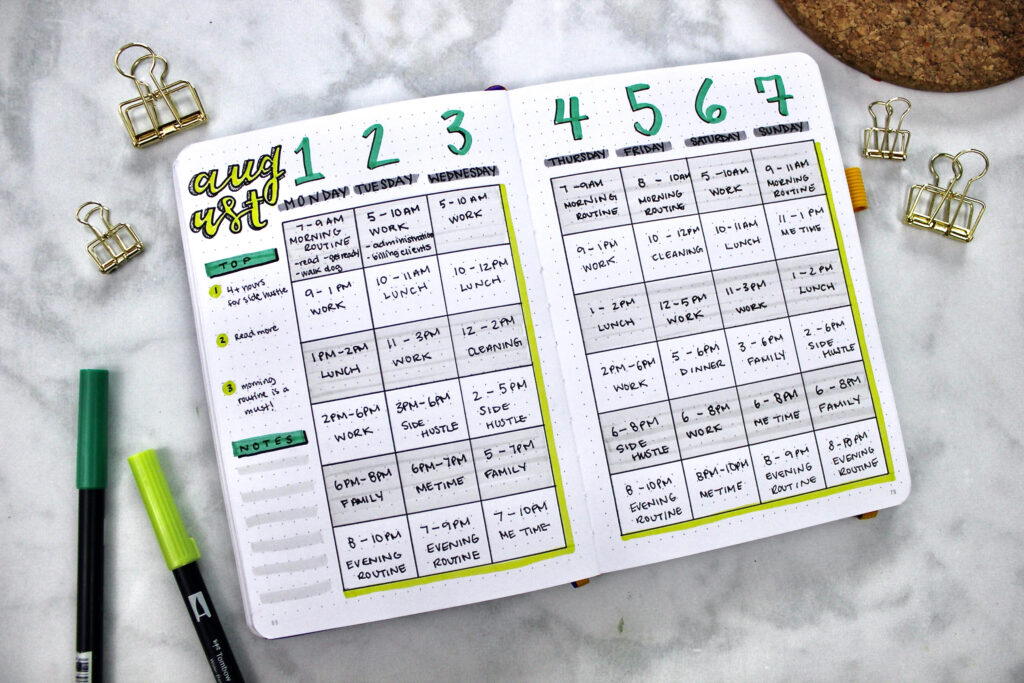
Instead of pre-sectioning off areas in your journal based on the hours, this options breaks the page down vertically into 6 equal blocks for each day of the week. This way if your schedule changes or falls outside of the traditional 6am – 8pm hours from the hourly layout, it allows you flexibility when planning out your blocks.
Instead of having a task list on the top of each day, the top weekly tasks are now on the far left still leaving room for any notes we want to take along the week.

Pros:
- Easy to use templates
- Works best for people on shift work
- Provides middle structure and middle flexibility in planning
- Increases productivity
Cons:
- Little room for daily tasks/top goals
- Less structure may be difficult to use in the beginning
Open Layout
Last one is my personal favourite and through experimenting I’ve found this leaves the most amount of room to switch up my day to match my needs.
Instead of putting in blocks or hourly dividers the days are instead left blank; leaving room for you to write in the tasks and time block you require. How I personally like to complete this is by first writing a list of the tasks I want to get done and referencing where they fall within my category listing. If I have a lot of cleaning tasks to do my cleaning block will be longer, and so on and so forth.
After prioritizing my list, I think “what can I realistically achieve?” and start blocking out my day. Since I work for myself time is not set in stone, however I still want to be mindful of it by maximizing what I can get done it a day to align with my business goals.

Pros:
- Lots of room for tasks and goals
- Provides little structure and lots of flexibility in planning
- Increases productivity
- Customizable for every person and day
Cons:
- More difficult to use if not confident in system
- Less structure may be difficult to use in the beginning
How To Avoid Bumping?
In the beginning you are in the experiment phase! Your time will be spent figuring out how much you can get accomplished in the hours you schedule out. The nice thing is there is no right or wrong answer when it comes to bumping.
If you are taking a more black and white perspective, as soon as the timer rings you are moving on to the next block. This will help keep you on track and avoid getting lost in the mindset of I don’t have enough time. One issue that I’ve personally found with this is if I have consecutive blocks requiring the previous task to be accomplished before I can move on to the next. For example, I first have to write this blog post before I can edit it.
That is why I take a middle ground approach. Generally I try not to schedule consecutive tasks, but when I can’t avoid it I ask myself the following questions: “How much longer do I think this task will take?”, “Do I have to get 100% of this task accomplished before I start on the next?” and “If I bump this block how will it affect the rest of my day?”.
Going back to my writing a blog post example. If I only have the introduction completed then there really is no point in starting the edit and my editing block should be move back or to another day. However, if I am 90% done and think the post will take another hour to write, I may pause and start editing the first couple paragraphs and come back to finishing the writing part another day. This method of organizing is to help maximize your productivity and keep you on track.
Finishing Early?
This is personally my FAVOURITE thing when it comes to block scheduling and is happening to me as I write this last paragraph out. I finished my last block of recording content for my YouTube channel early and moved on to another task on my to do list.
If you don’t want to bump your blocks up start by looking at your goals and seeing what you can do to accomplish those. Maybe it is getting outside to walk more. Perfect! You now have 10 minutes to walk around the block before your next block begins.
A couple things you may want to consider if this keeps recurring is that your block times may need to be shortened or you should try and do more within that section related to the topic. If you’re a student and have a 2 hour study block and finish a half hour early, figure out what else would be beneficial to get done right now regarding school (ex. email catch up, another chapter, planning out research paper etc.).
Overall Takeaways
Whatever method you end up choosing, all 3 will help reduce decision fatigue and increase your productivity. This has been detrimental to the success of my life and keeping me on top of both my personal and professional goals. If you have any questions leave them in the comments below!